
LAINNOV Applications Guide
LAINNOV Applications runs everything after someone presses Submit: who reviews each application, which stage it is in, what has waited too long, interviews, scores, sign-off, offers and the final decision, across every programme you run.
A programme is one intake: an admissions round, a scholarship, a job opening or a grant call. Each programme is a form that takes applications, with its own stages and reviewers. This guide walks through the workspace in the order you will use it. Screenshots use a made-up organisation, Northbridge Institute, so every name and number is an example only.
Words in bold are the exact labels you will see on screen.
Your first programme
Do these in order. Each item links to the chapter that explains it.
- Start a programme from a template or one of your forms. Starting a programme
- Check the stages and give each one a time limit. Stages and time limits
- Add your reviewers and decide what each of them sees. Reviewers and access
- Share the application form so people can apply. One programme
- Work your inbox every day. The inbox
Opening Applications
- From All Services, open Applications. You can also open it from the Forms side menu: Applications workspace.
- The side menu on the left takes you everywhere: Overview, Inbox, Programmes, Interviews and Reports. Collapse it with the arrow at the bottom to get more room.
- The numbers beside the menu items are live: how many applications are waiting in each queue.
1The overview
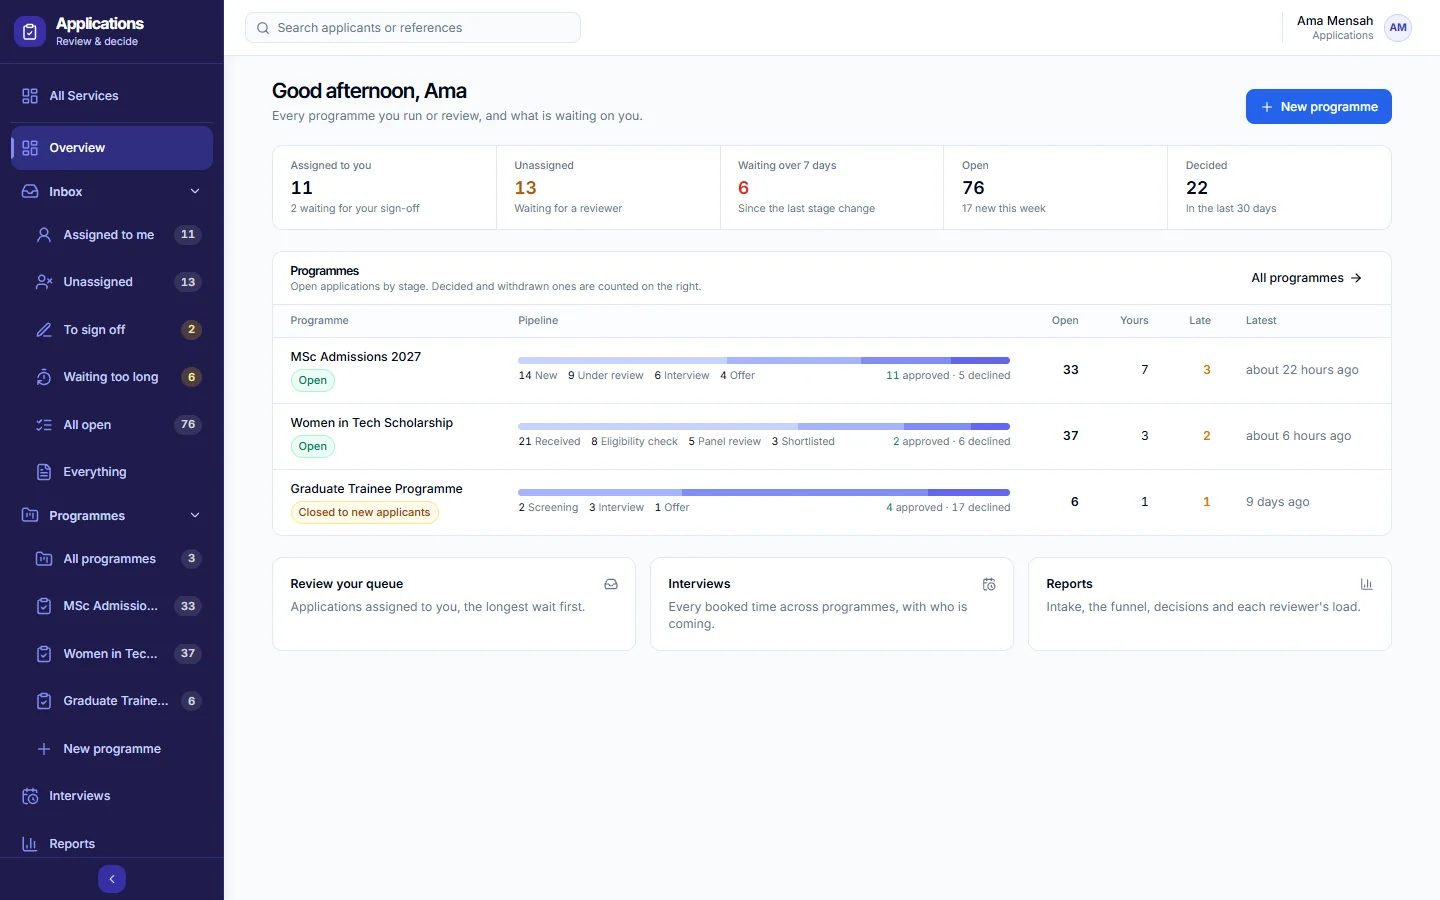
- The figures across the top: Assigned to you, Unassigned, waiting too long, Open and Decided in the last 30 days.
- Programmes: each programme with a bar showing where its open applications sit, how many are yours, how many are late, and when the latest one arrived.
- Select a programme name to open it, or a figure to go straight to that queue.
2Starting a programme
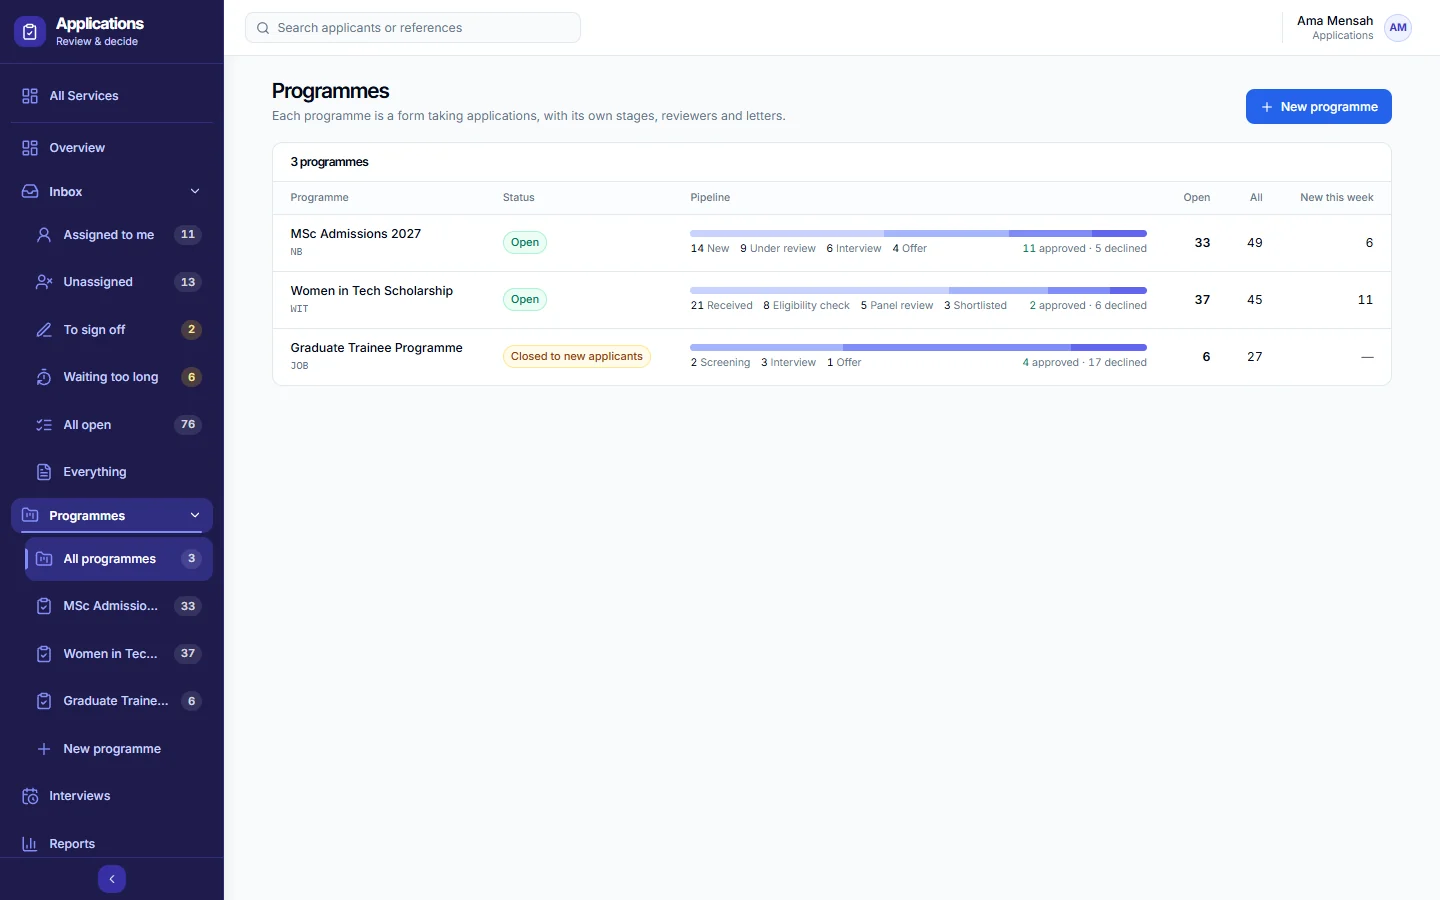
Select New programme on the overview or in Programmes. You can start two ways.
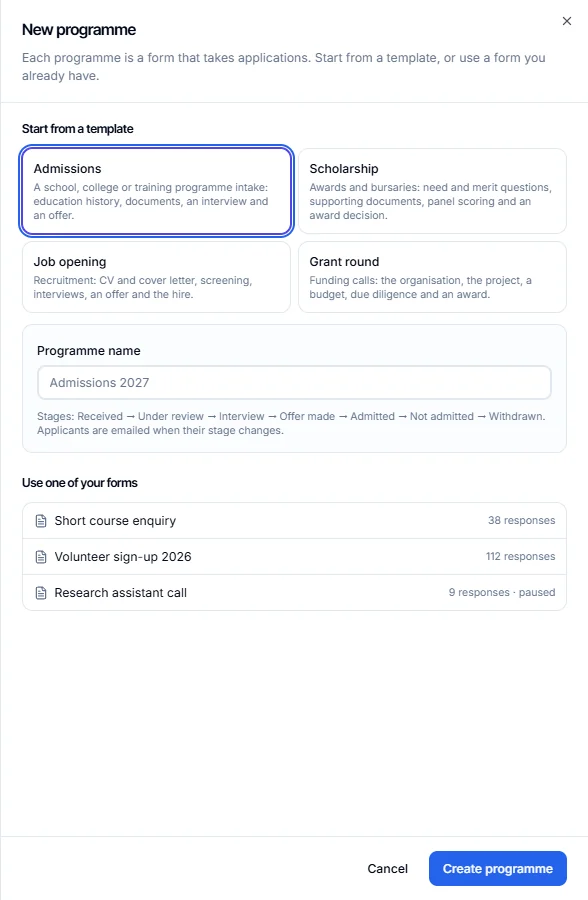
From a template
- Choose Admissions, Scholarship, Job opening or Grant round.
- Type the Programme name, for example "MSc Admissions 2027".
- Select Create programme. The application form and its review stages are made for you, and applicants are emailed when their stage changes.
- Open Edit form on the programme page to change the questions, and Workflow settings to change the stages.
From one of your forms
- Under Use one of your forms, pick the form.
- If it already has responses, leave Bring in the earlier responses ticked to add them as applications in the first stage. No emails are sent for them.
- Select Start taking applications. From now on every submission becomes an application with a reference.
Run each intake as its own programme. Next year, duplicate the form and start a new programme from it, so this year's numbers stay separate.
3The inbox
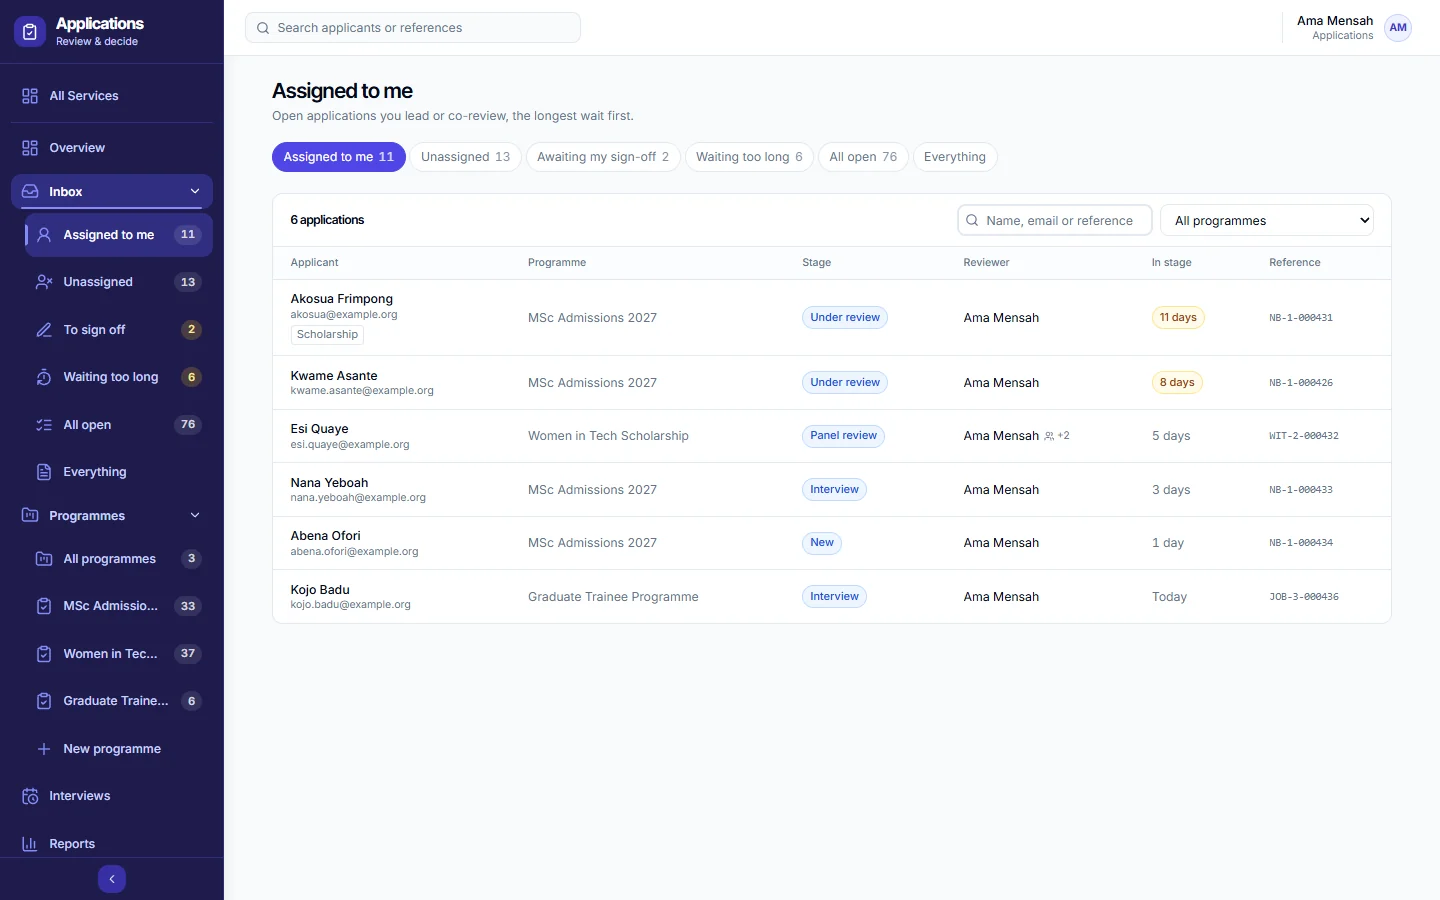
The inbox puts every programme's applications in one list. Choose a queue at the top or in the side menu:
| Queue | What it shows |
|---|---|
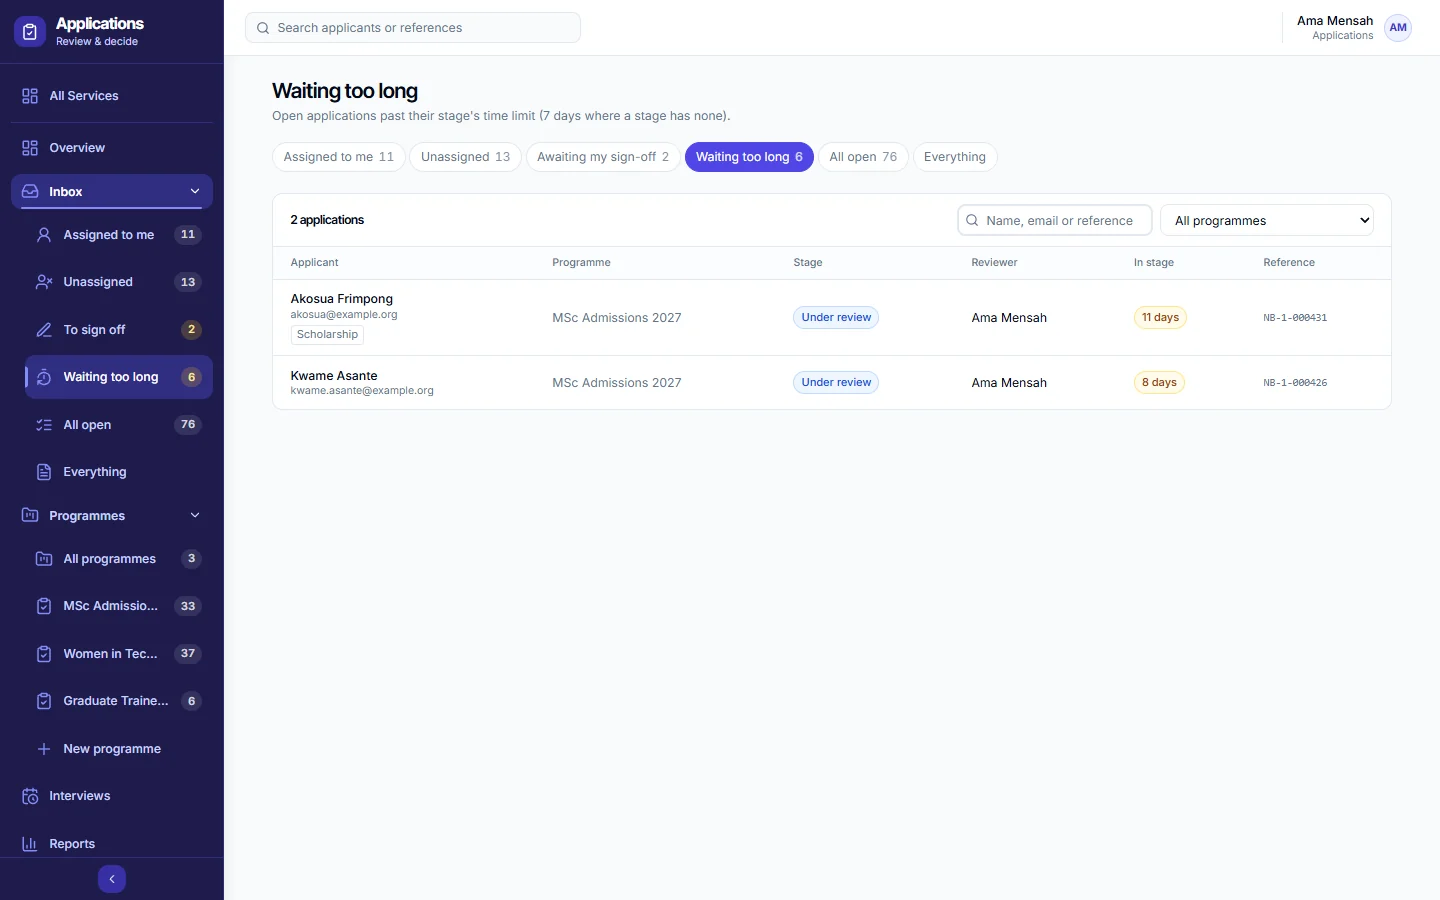
| Assigned to me | Open applications you lead or co-review, the longest wait first. |
| Unassigned | Open applications nobody has picked up. |
| Awaiting my sign-off | Approvals waiting for your signature (only when you are named in a sign-off). |
| Waiting too long | Open applications past their stage's time limit (Overdue in the side menu). |
| All open | Everything still waiting on the team. |
| Everything | Every application, decided ones included, newest first. |
- Search by name, email or reference. The search box at the top of every page searches all programmes.
- Filter by programme, and then by stage.
- In stage shows how long the application has sat in its current stage. It turns amber once it passes the stage's time limit.
- Select a row to open that application's review.
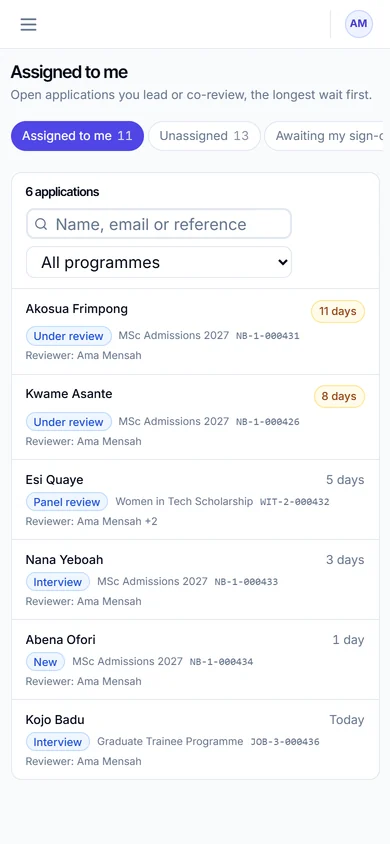
On a phone, each application is one block with its stage, wait and reviewer.
4One programme
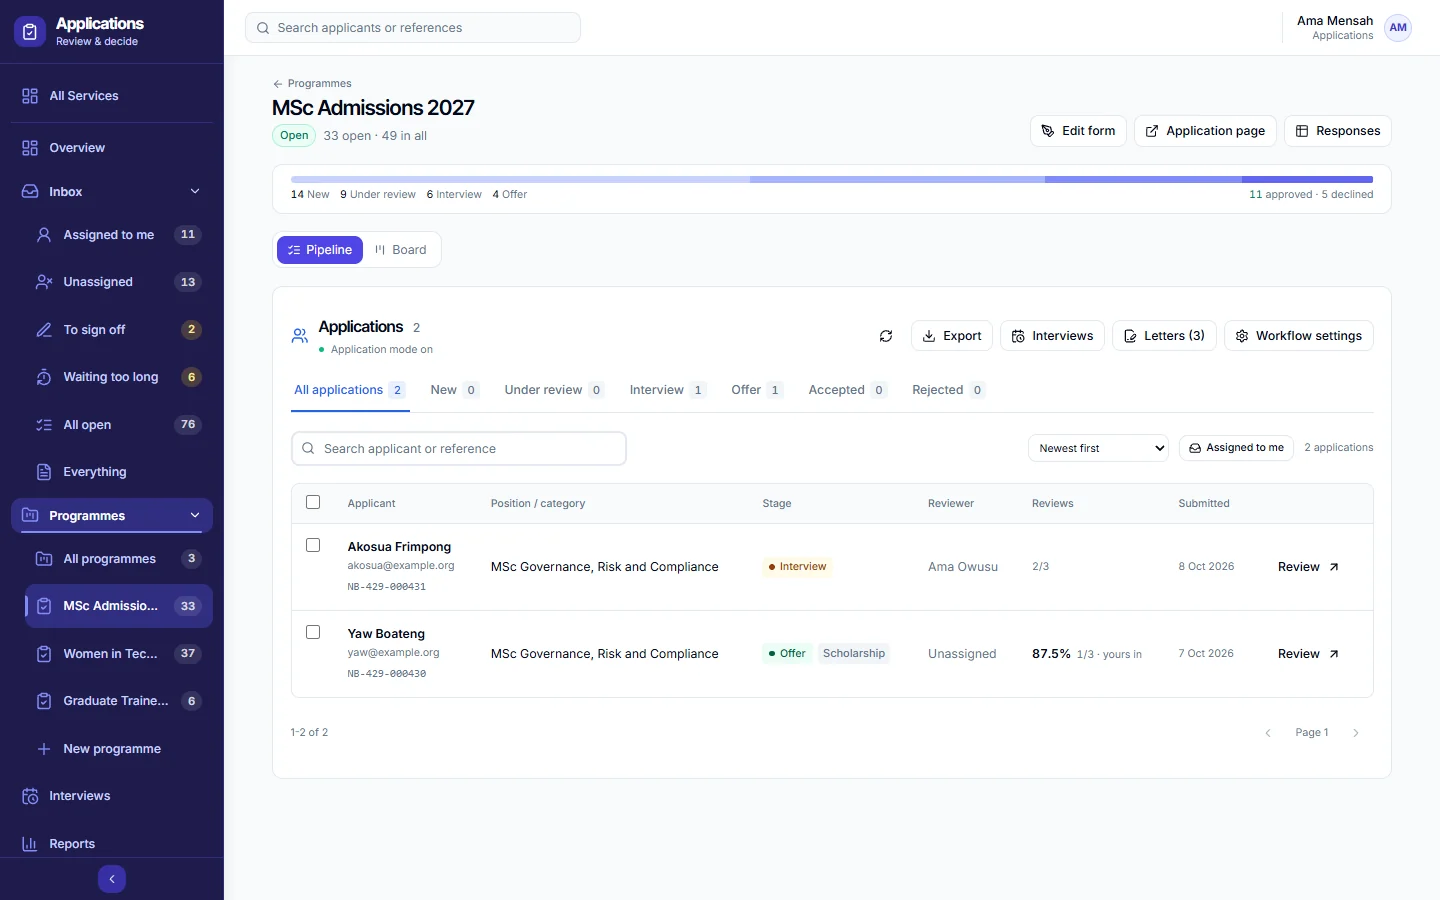
- The buttons at the top: Edit form changes the application form, Application page opens it as applicants see it (share this link), Responses opens the full answers table in Forms.
- Pipeline lists the applications with stage tabs, search, bulk actions and export. This is the same list as the Applications tab in Forms.
- Board shows one column per stage.
The board
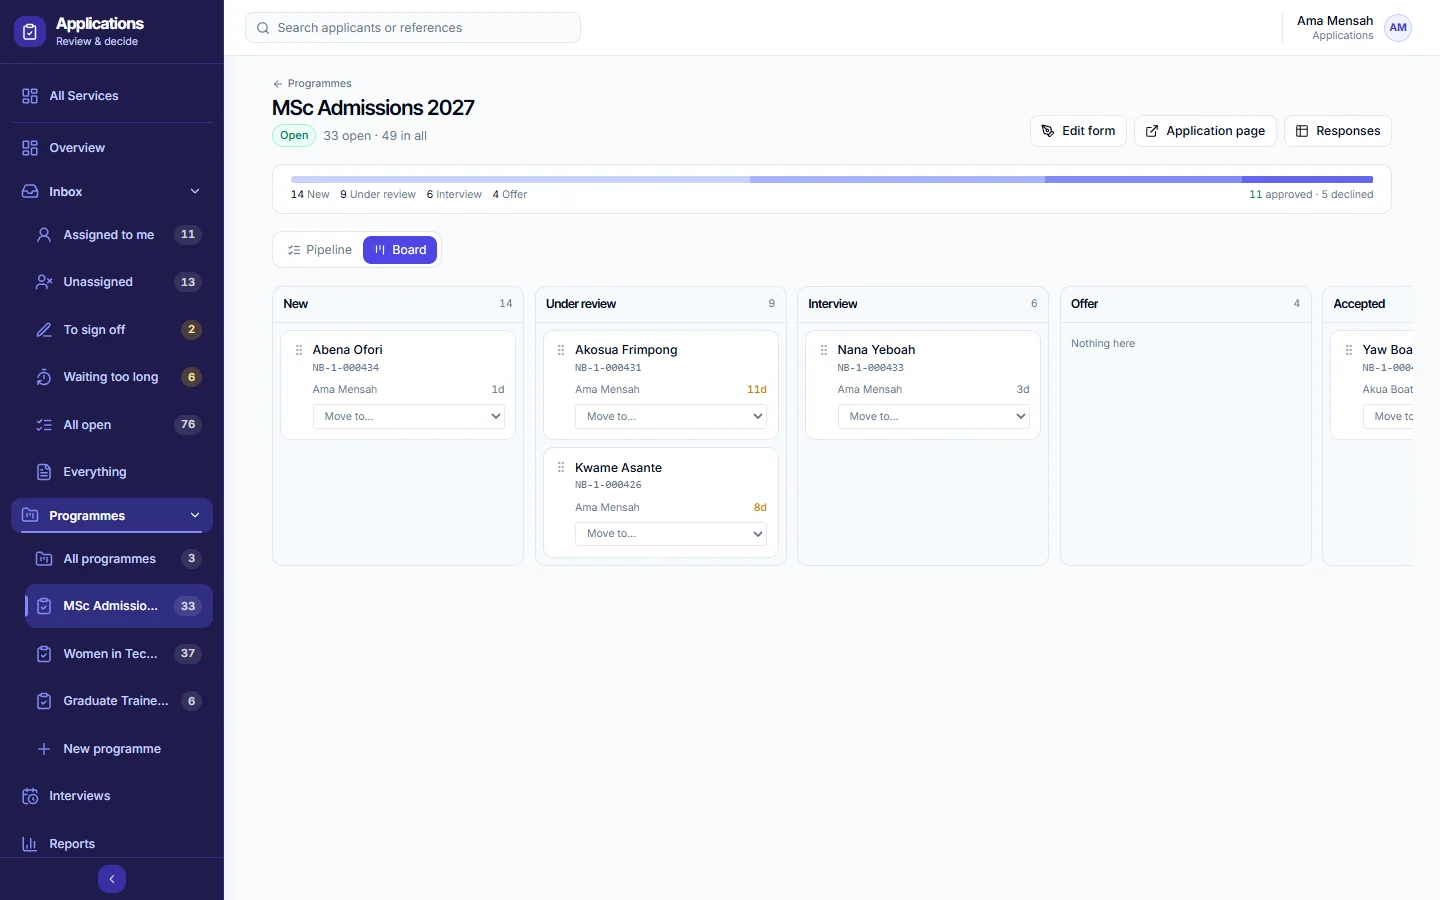
- Drag a card to another column, or choose a stage from its Move to… menu. The move sends the same emails and letters as a move from the review.
- The approved and rejected columns take no cards. Approve and reject from the review, where you can add the comment the applicant may receive.
5Reviewing an application
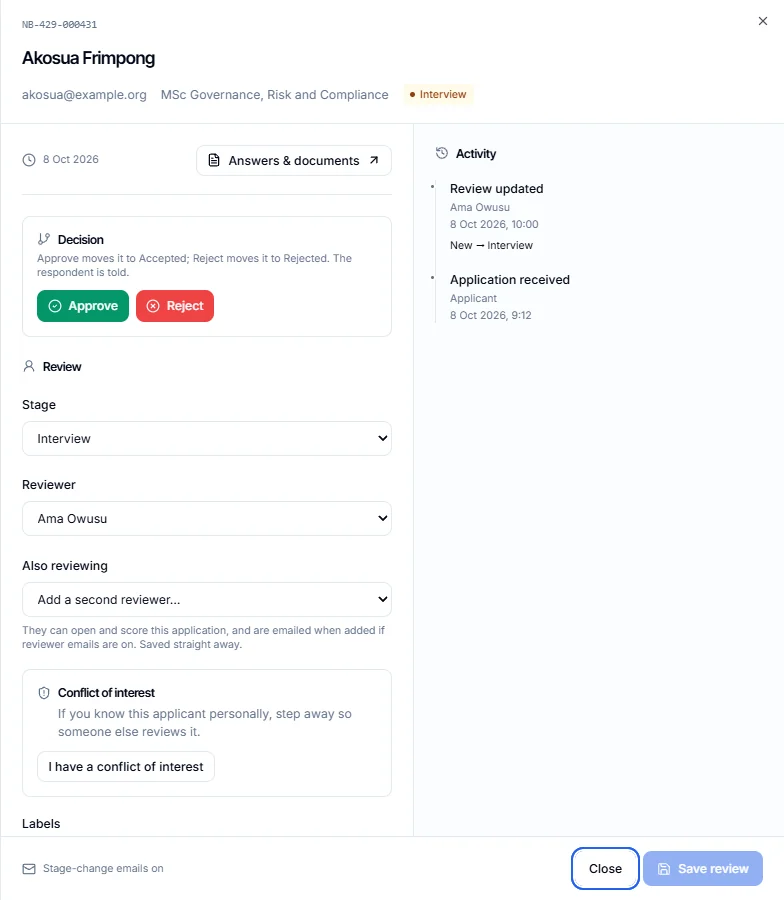
Select an application anywhere to open its review. Everything about the application is here:
- Answers & documents opens what the applicant submitted.
- Stage, reviewer and labels, with a note for the team. Save with Save review.
- Scorecard, documents and interview, when the programme uses them.
- Decision: Approve or Reject, with a comment you can share with the applicant. A rejection needs a reason.
- Activity: every change, by whom and when.
The Forms guide explains scorecards, document checklists, interviews, letters and automations in full; they work the same here.
6Stages and time limits
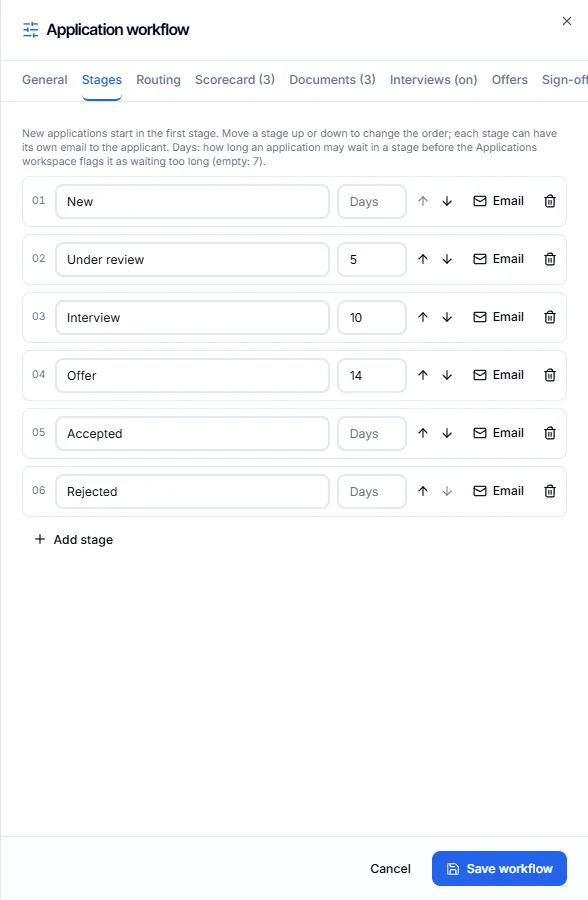
- On the programme page, select Workflow settings, then Stages.
- Rename, reorder, add or remove stages. New applications always start in the first one.
- In Days beside a stage, type how long an application may wait there. Leave it empty for the standard 7 days.
- Select Save workflow.
An application that waits longer than its stage allows shows in Waiting too long, turns amber in the inbox and on the board, and counts as late in Reports.
7Conflict of interest
If you know an applicant personally, a relative, a colleague or a former student, step away so someone else reviews them.
- Open the application's review.
- Under Conflict of interest, select I have a conflict of interest.
- Say why. Only the people who run the programme see this.
- Select Declare and step away.
You come off the application, as its reviewer or co-reviewer, and nobody can assign you to it again. The application's history records that a conflict was declared, without the reason. If you were its reviewer, it becomes unassigned so someone else can pick it up.
8Sign-off before approval
Some decisions need more than one person: a head of department, then a dean. Name them in Sign-off and every approval waits for them, in order.
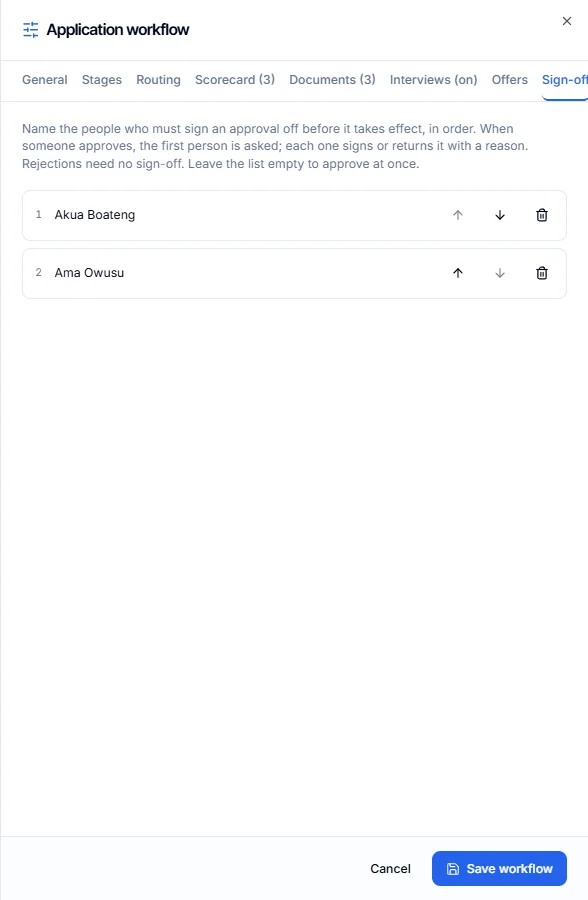
Setting it up
- Open Workflow settings, then Sign-off.
- Choose people from Add someone who signs off, in the order they should sign. Use the arrows to change the order.
- Select Save workflow.
Only people who already have edit or applications access to the form can be named. Give them access first.
How it works
- When someone selects Approve, the application does not move yet. The first person is emailed "To sign off" with a link.
- Each person opens the review and selects Sign off, or Return with a reason. A return ends the round, and the person who approved is told why.
- When the last person signs, the approval goes through: the application moves to the approved stage and the applicant gets the email, letter and comment exactly as if it had been approved directly.
- Rejections need no sign-off. Rejecting an application also ends any sign-off still waiting.
- Applications waiting for your signature are in Awaiting my sign-off in the inbox, and under To sign off in the side menu.
9Interviews
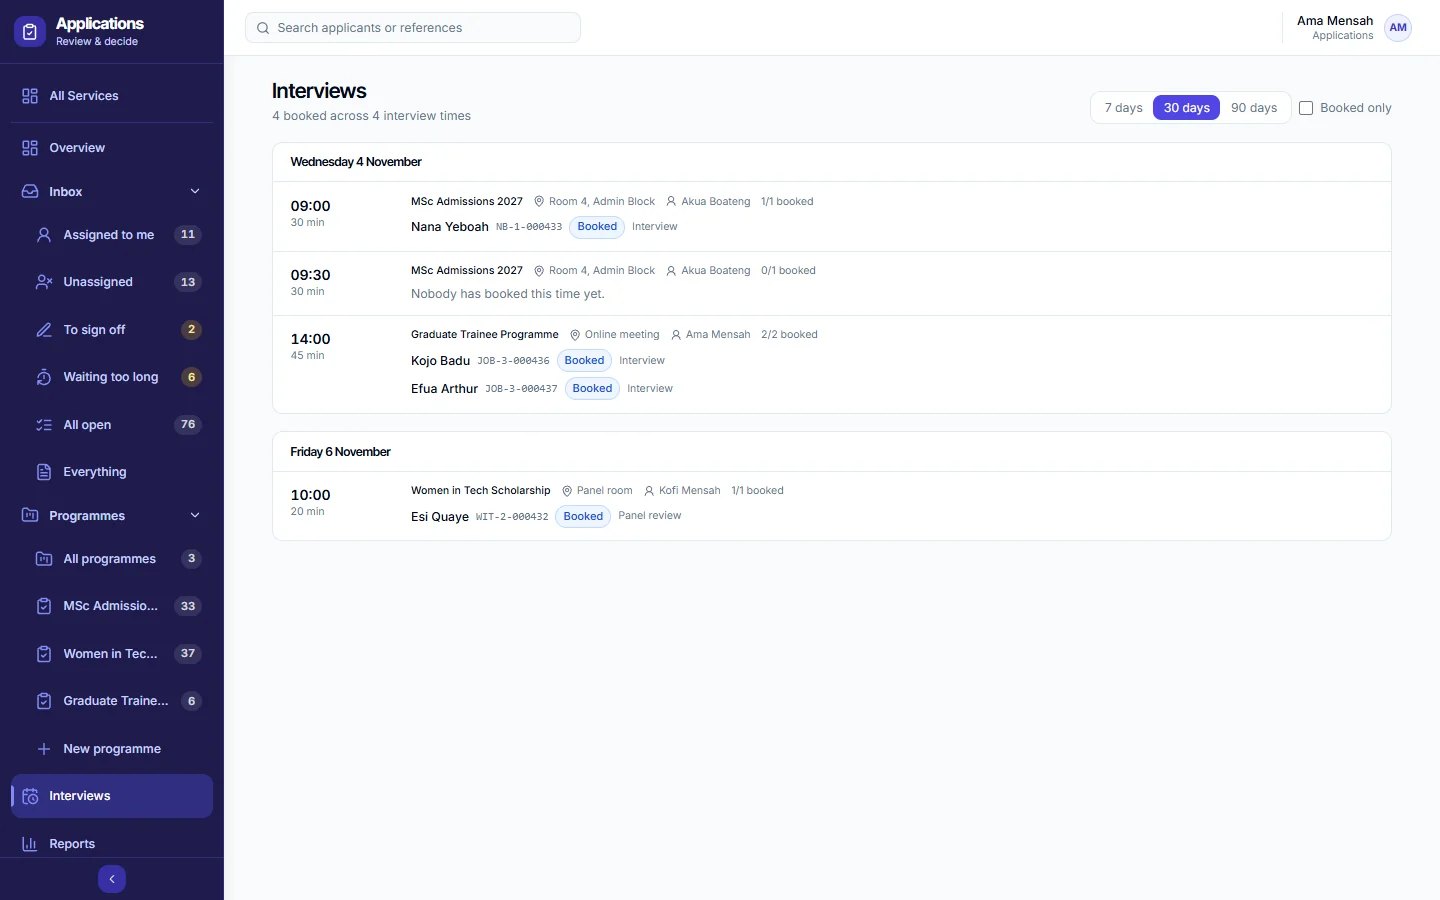
- Interviews in the side menu lists the next 7, 30 or 90 days across all programmes, grouped by day, in each programme's time zone.
- Each time shows the programme, place, interviewer, how many places are taken, and each booked applicant with their status. Select a name to open their review.
- Tick Booked only to hide times nobody has chosen.
- Interview times are added inside a programme: Workflow settings, then Interviews.
10Offers applicants answer themselves
Instead of chasing applicants for a yes or no, let them answer the offer from their status page.
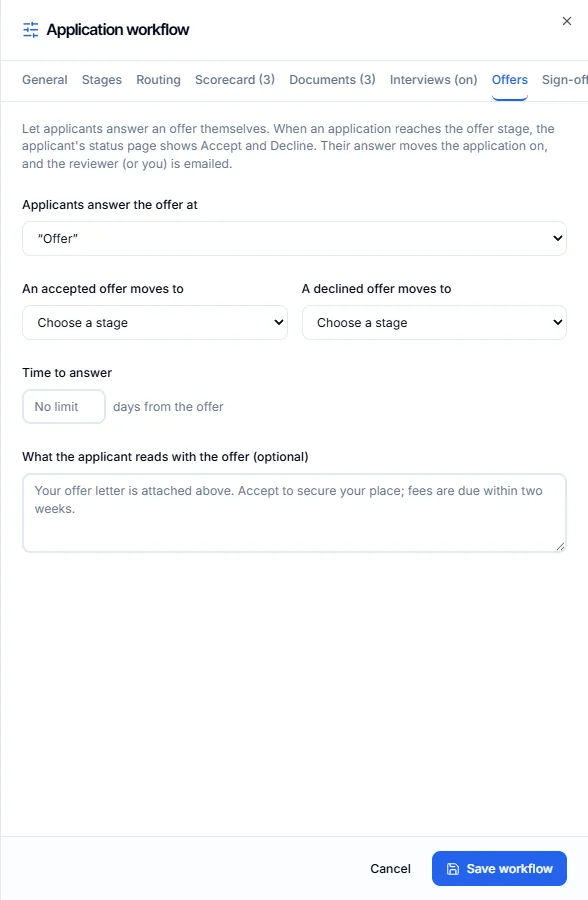
- Open Workflow settings, then Offers.
- In Applicants answer the offer at, choose your offer stage.
- Choose where An accepted offer moves to and where A declined offer moves to.
- Optionally set Time to answer in days, and write what the applicant reads with the offer.
- Select Save workflow.
When an application reaches the offer stage, the applicant's status page shows You have an offer with Accept the offer and Decline. Their answer moves the application to the stage you chose, emails its reviewer (or you), and sends that stage's emails and letters. After the time to answer has passed, the buttons close and the applicant is asked to contact you.
11Reports
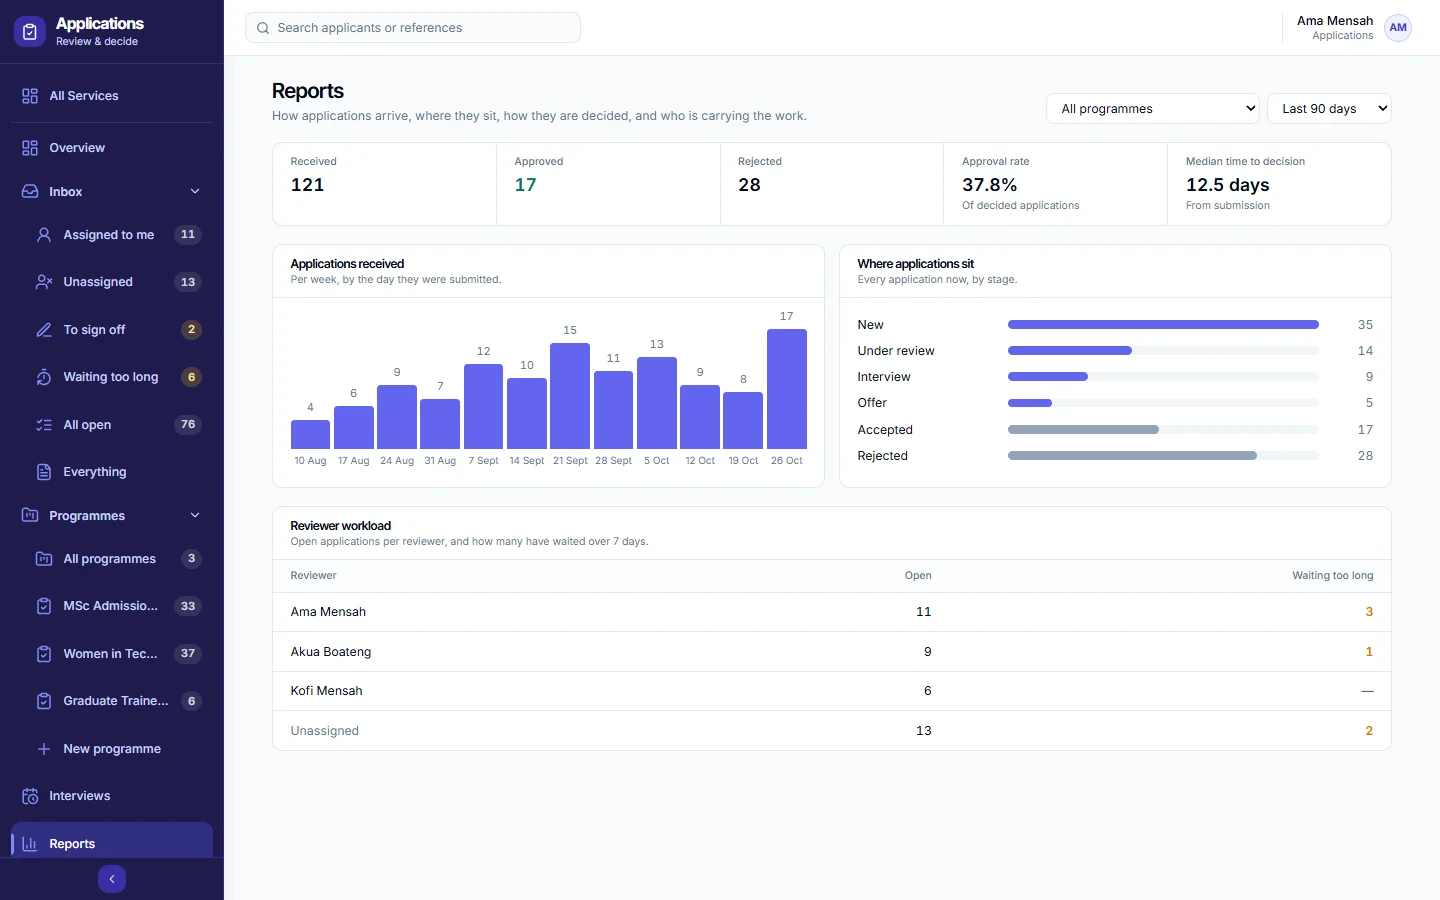
- Choose a programme, or all of them, and a period: the last 30, 90, 180 or 365 days.
- Received, approved, rejected, the approval rate of decided applications, and the median time to a decision from submission.
- Applications received per week, and where applications sit now by stage.
- Reviewer workload: each reviewer's open applications and how many are waiting too long. Use it to share the work out.
12Reviewers and access
- Who sees a programme. The form's owner and co-owners, people the form is shared with, and people invited to review it. Nobody else, and an organisation's programmes never show to anyone outside it.
- Inviting a reviewer. From a review, use Add a reviewer, or share the form from Forms with edit or applications access.
- Reviewers who see only their own. In Workflow settings, General, choose that reviewers see only the applications assigned to them. They then see just those, in the review and in every queue and report.
- Routing. In Routing, send new applications to a reviewer by their answers, for example by programme or country.
- Team members. Anyone on your team who can use Forms can use Applications.
What applicants see
Every applicant gets a reference by email and a private status page at /applications/status, opened with a code sent to their email. No account is needed. There they see their stage and every update, download letters, upload documents you ask for, book an interview, pay fees you bill at a stage, answer an offer, and withdraw if they change their mind.