
Class Attendance Guide
Class attendance in LAINNOV Scan is how a faculty takes lecture attendance: departments and programmes, a student register, classes assigned to lecturers, a rotating code on the classroom screen, and a standing for every student.
This guide walks through the faculty workspace, the lecturer portal, a live lecture, and what students see on their phones. Each chapter says what the screen is for, what you see, and how to do each task step by step. Screenshots use a made-up faculty, Faculty of Computing and Information Systems, so the names and figures are examples only. Sharing this with a faculty office? Start with the short overview (also a PDF).
Words in bold are the exact labels you will see on screen. What you can do depends on who you are (the faculty, a department administrator, a course lead, an assistant or a viewer). When a task needs a particular role, the chapter says so; the full list is in Roles.
First-week checklist
Setting things up in this order saves corrections later. Each item links to the chapter that explains it.
- Name the faculty and subscribe to Custom Email so invites and warnings leave from your domain. Sign-in & settings
- Create departments and give each one an administrator. Departments
- Add programmes for each department (for example BSc Information Technology). Programmes
- Import the student register — index numbers, names, programme and level. Nobody is contacted. Students
- Add lecturers and send each one the set-password link. Lecturers
- Create classes — course code, title, department, programme and who teaches it. New class
- The lecturer adds the weekly timetable, sets expected attendance and the classroom location, then runs the first lecture. The lecturer portal
Opening class attendance
Who can use it
Class attendance is part of LAINNOV Scan. The faculty is the LAINNOV account that owns the class forms. Department administrators and lecturers sign in at a separate link with their own email and password — they do not need an LAINNOV account of their own.
If Scan is not on the owner’s plan, the faculty workspace will say so until the plan includes it.
Getting there
- Faculty. From LAINNOV Scan, open Classes (or go to LAINNOV Scan › Lecturers & classes). You land on the faculty Overview.
- Department administrators and lecturers. Open the faculty’s sign-in link (shown in Sign-in & settings), for example services.lainnov.com/lecturers/your-code.
- Students. They never sign in to a portal. They scan the code on the classroom screen, or open the class link the lecturer shares.
LAINNOV Scan also has sessions and a public scanner for events and workplaces. This guide is the class product: faculties, departments, lecturers and a rotating lecture code. The two do not share a class list.
Finding your way around
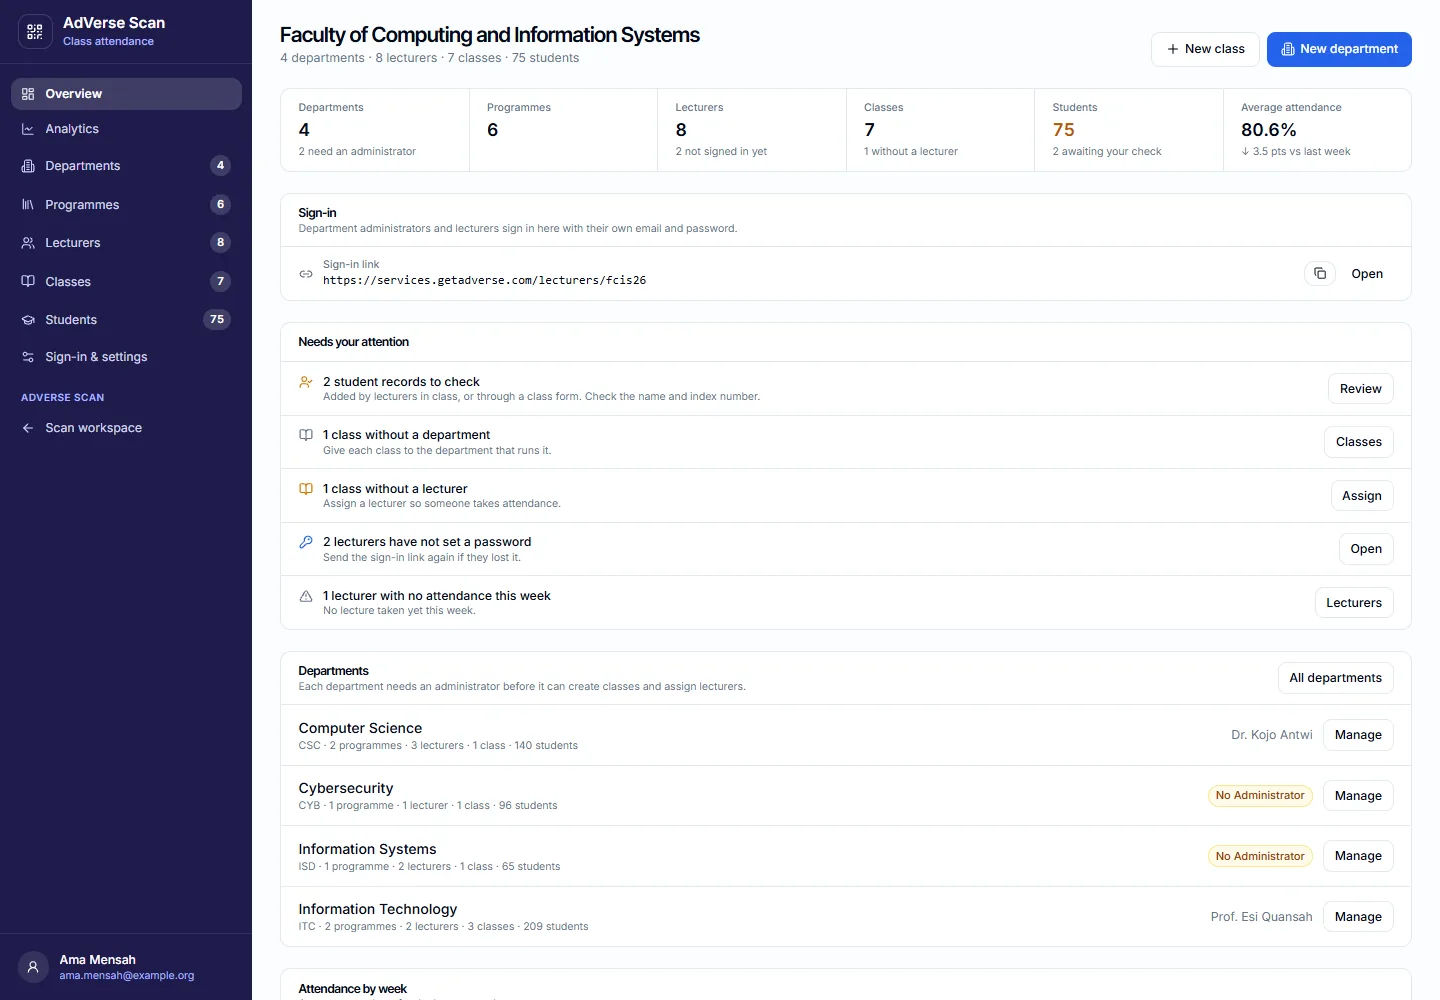
- Sidebar (faculty). Overview, Analytics, Departments, Programmes, Lecturers, Classes, Students, and Sign-in & settings.
- Sidebar (department administrator). The same, limited to their department. They do not see other departments or Sign-in & settings.
- Sidebar (lecturer). Overview, Analytics, Classes, and Account. They only see the classes assigned to them.
- Forms open from the side. New class, a lecturer, a student record and most editors slide in from the right. Close with the X, Esc, or Cancel.
1Overview
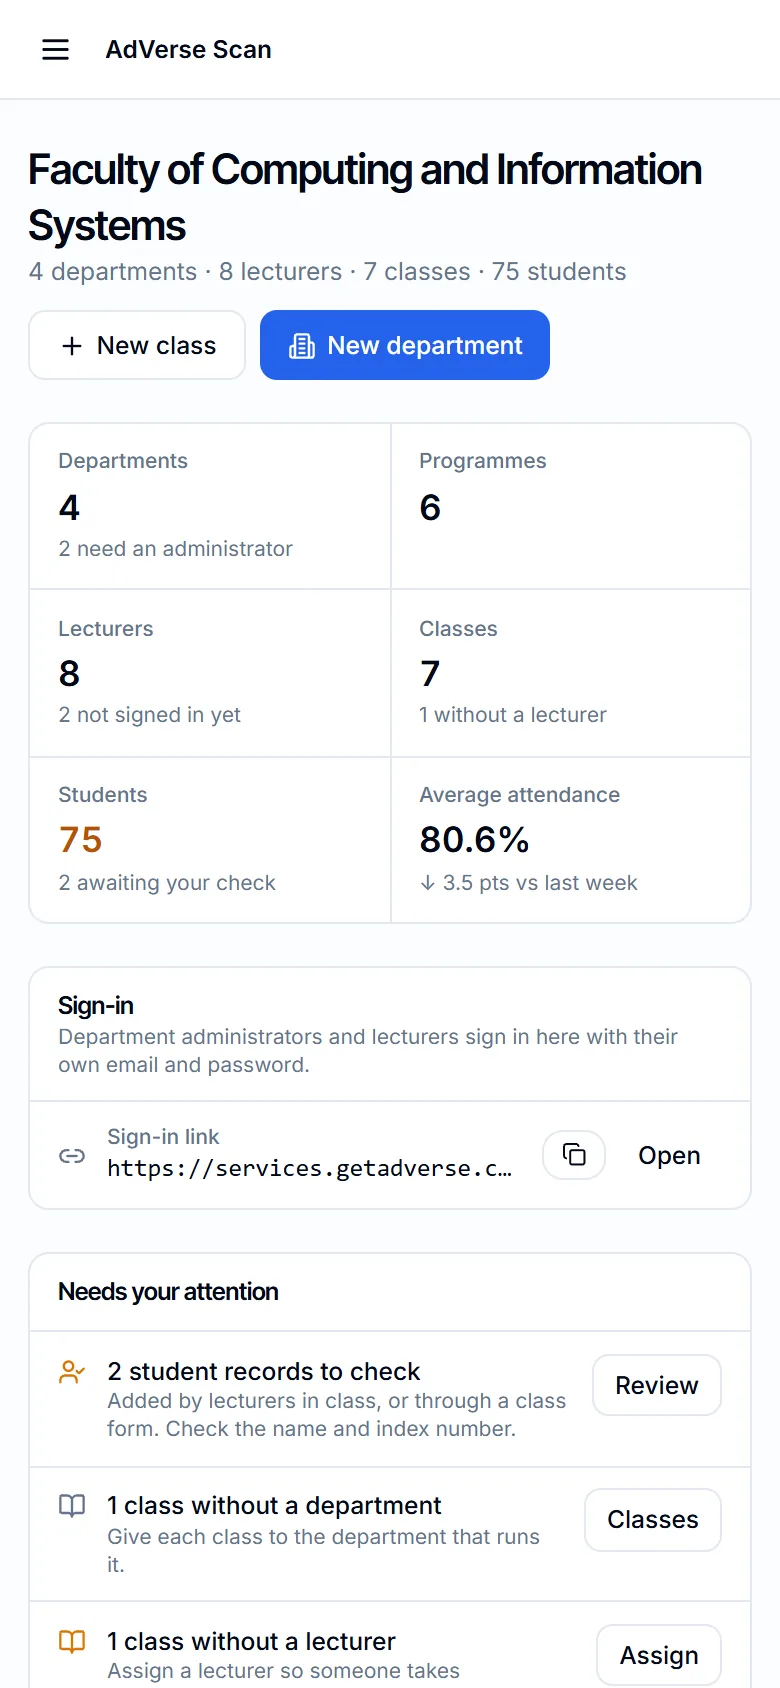
A one-page picture of the faculty (or the department): how many departments, lecturers, classes and students you have, attendance this week, classes that need a lecturer, and students below the expected level.
- Figures. Departments, programmes, lecturers (and whether they are signed in), classes, students, and average attendance against last week.
- Sign-in. The link department administrators and lecturers use. Copy or Open it.
- Departments and classes. Each card or row opens that department or class.
- Attendance by week. The last ten weeks across every class. A dashed line marks the expected attendance when every class uses the same one.
- Students at risk. Students below target or with consecutive misses. Open a record, or warn them from here (Custom Email required for email; SMS only if that lecturer may send texts).
The Overview also flags a missing Custom Email domain, a department without an administrator, a class with no department or no lecturer, invited lecturers who have not set a password, and lecturers quiet this week.
2Analytics
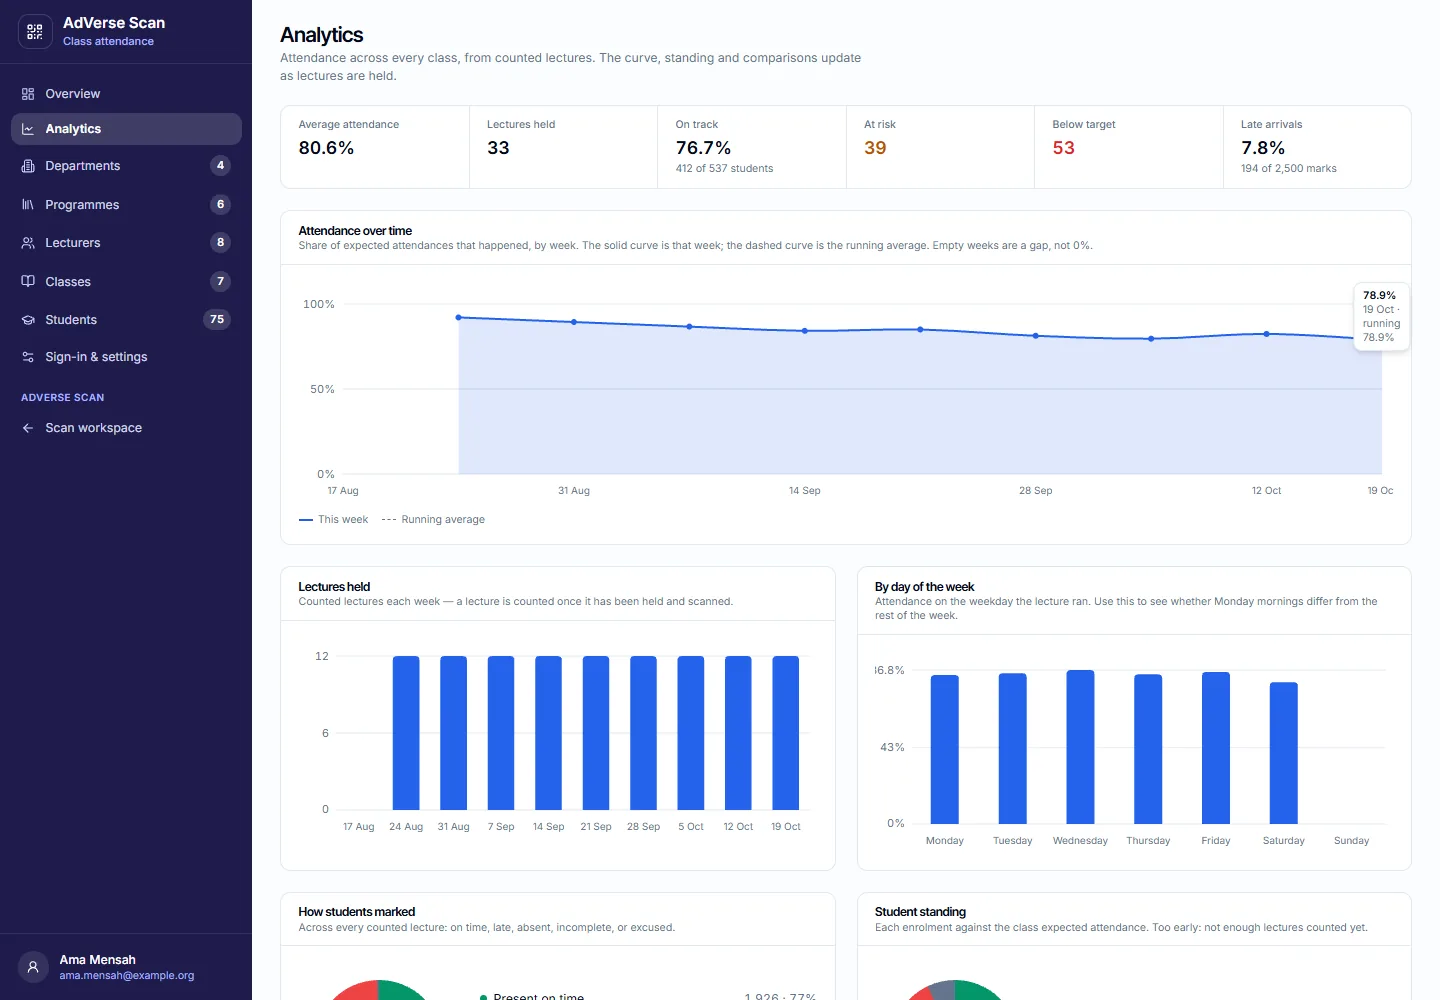
A longer view than Overview: the weekly trend, which weekdays lectures fall on, how many sign-ins were on time or late, how many students are on track / at risk / below target, and a table of departments and classes. Click a class to open it.
3Departments
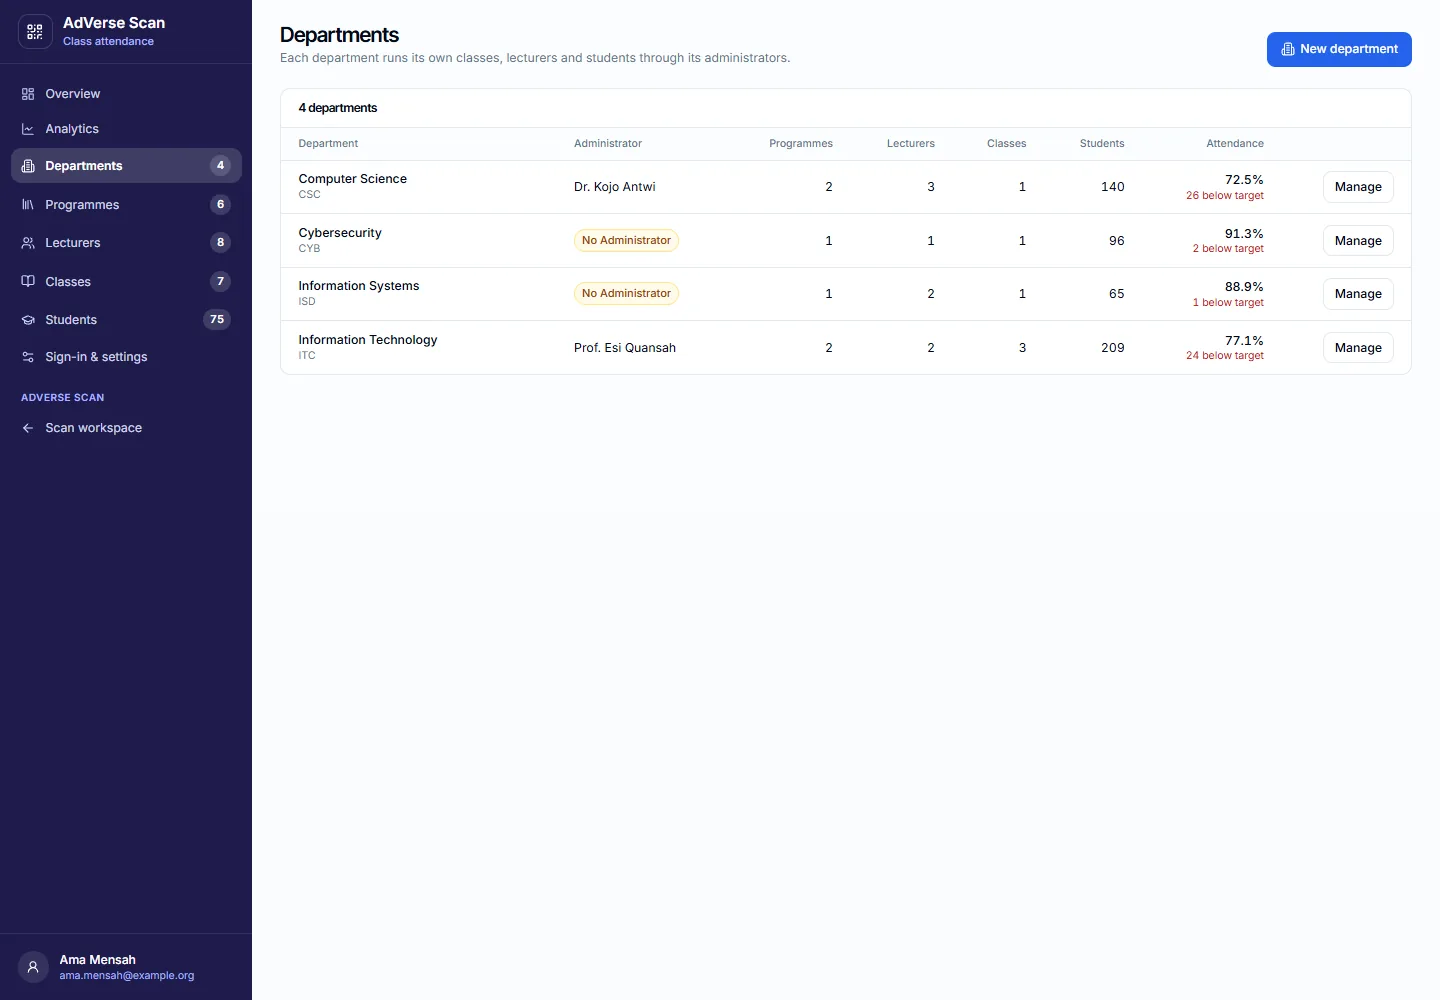
The faculty creates departments. A department administrator then runs that department: its programmes, lecturers, classes and students.
- Select New department (Overview or Departments).
- Type the Name and, if you like, a short Code.
- Open the department and Add administrator. They get a set-password link at the faculty sign-in page. They sign in like a lecturer, then see only this department.
You can add more later. A department without an administrator cannot create classes or invite lecturers on its own — the faculty can still do that for them.
4Programmes
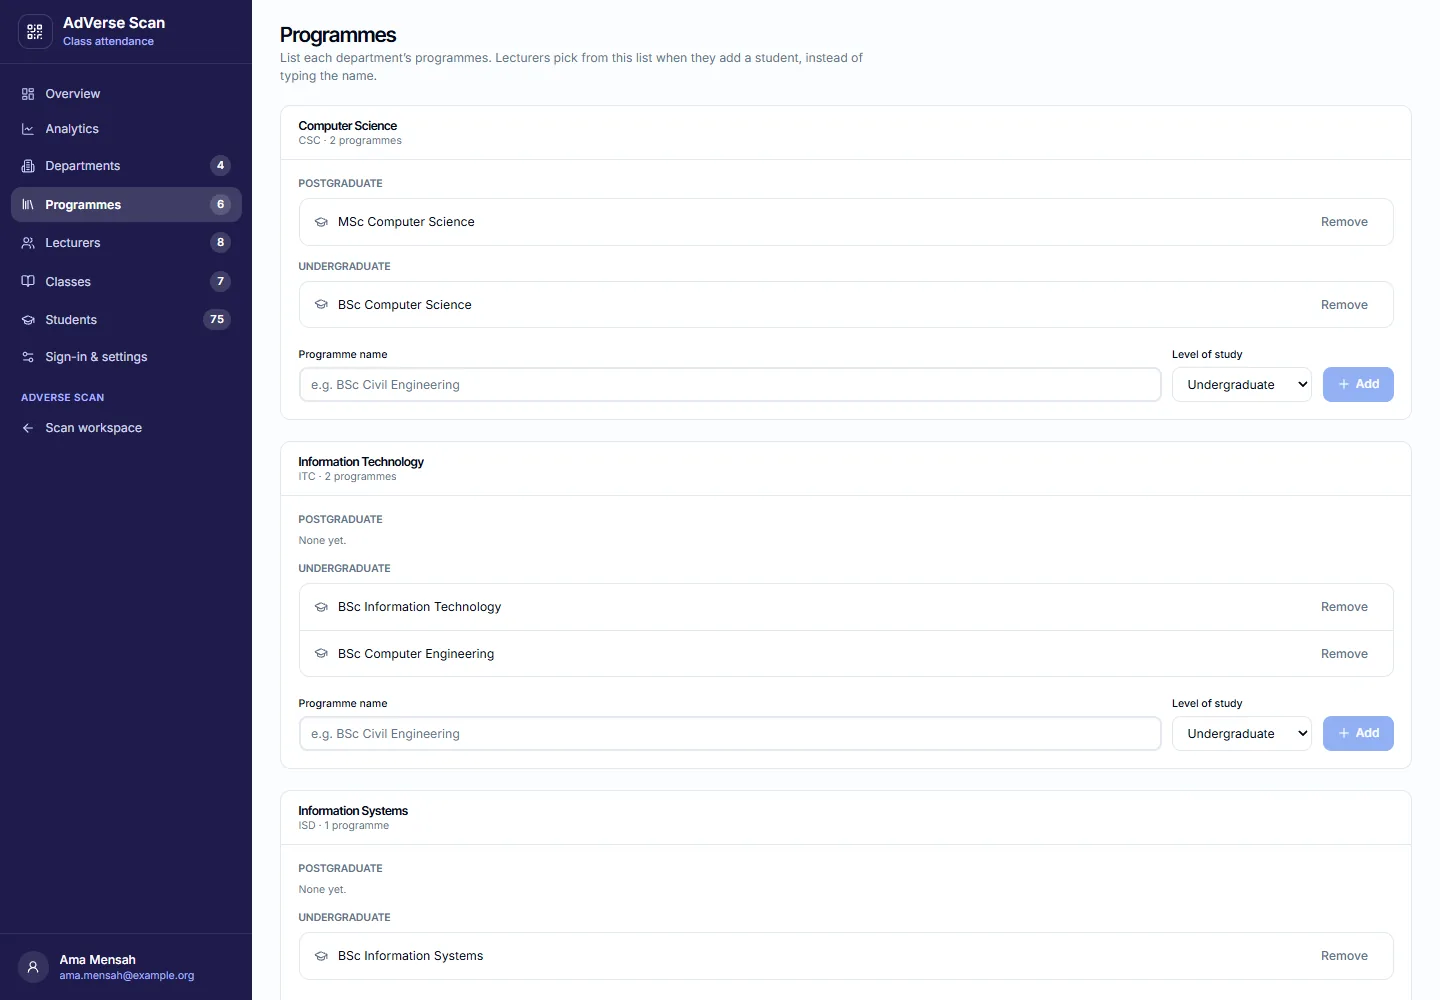
Each department has a list of programmes (BSc Information Technology, MSc Computer Science, and so on). Classes are attached to a programme when they are created. Students on the register also carry a programme and a level, so you can enrol a whole group onto a class.
- Open Programmes (or the department, then its programmes).
- Select the department, type the programme name, and choose Undergraduate or Postgraduate.
- Add every programme the department teaches before you create its classes — New class asks for one.
5Lecturers
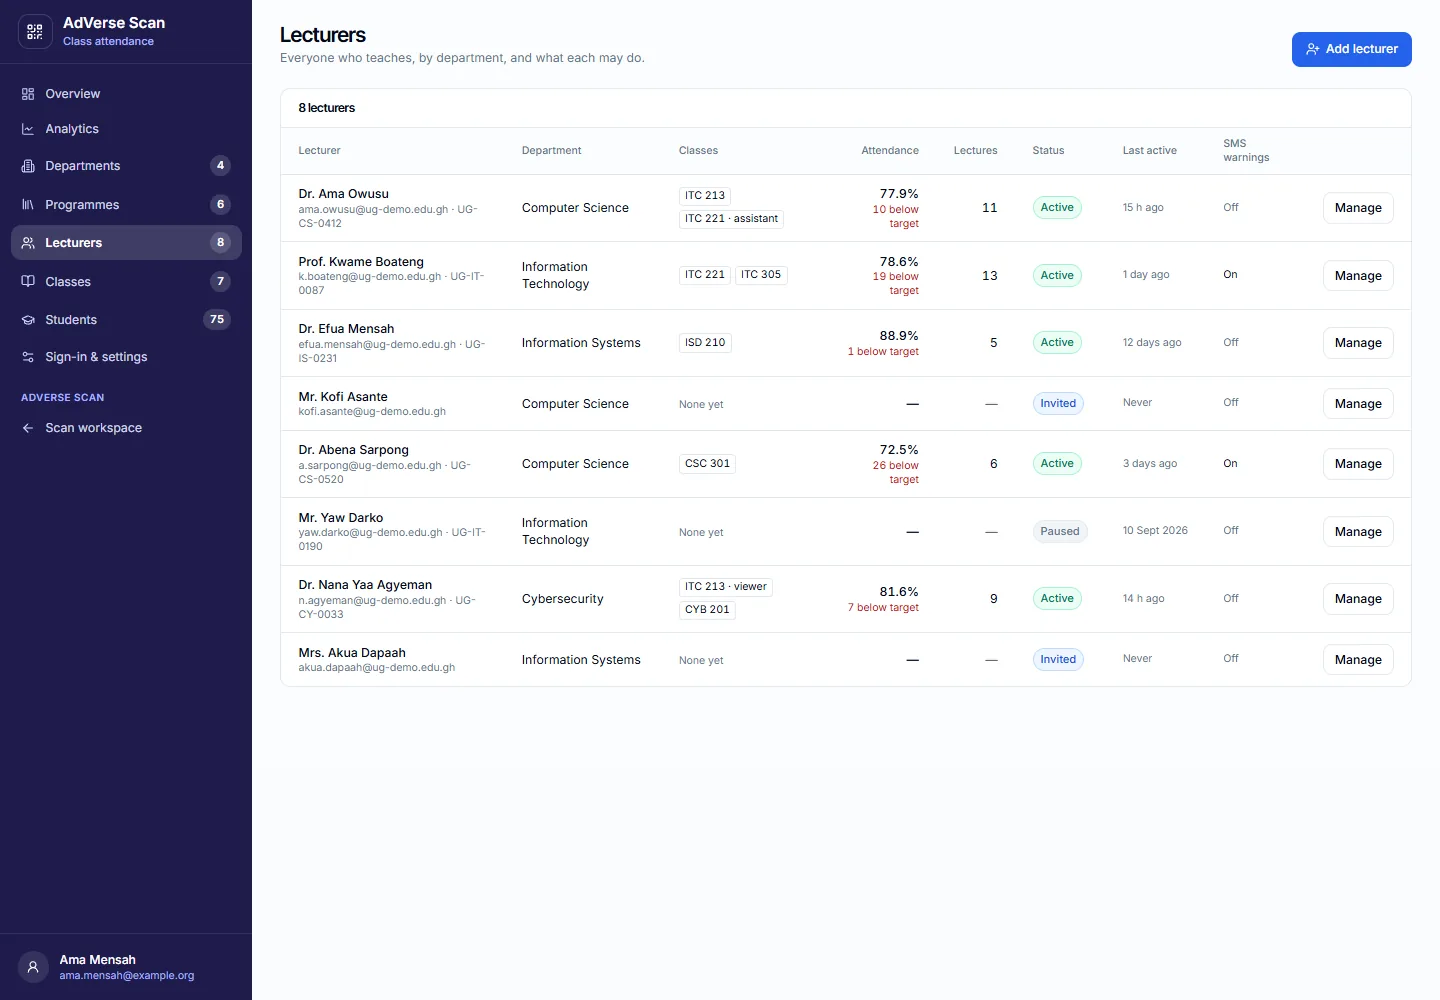
The faculty or a department administrator adds lecturers. Each person gets an email and a set-password link. They are not LAINNOV users.
- Select Add lecturer.
- Enter Name and Email. Optionally a staff ID, phone, and department.
- Turn on Can send SMS only for people who should send attendance warnings by text (your SMS credits).
- Send the invitation. If Custom Email is not ready, copy the link and send it yourself.
A lecturer’s status is Invited until they set a password, then Active. You can suspend someone (they cannot sign in) or remove them from the list. Removing them takes them off every class.
Open a lecturer to see their classes and to sign them out of every device.
6Classes
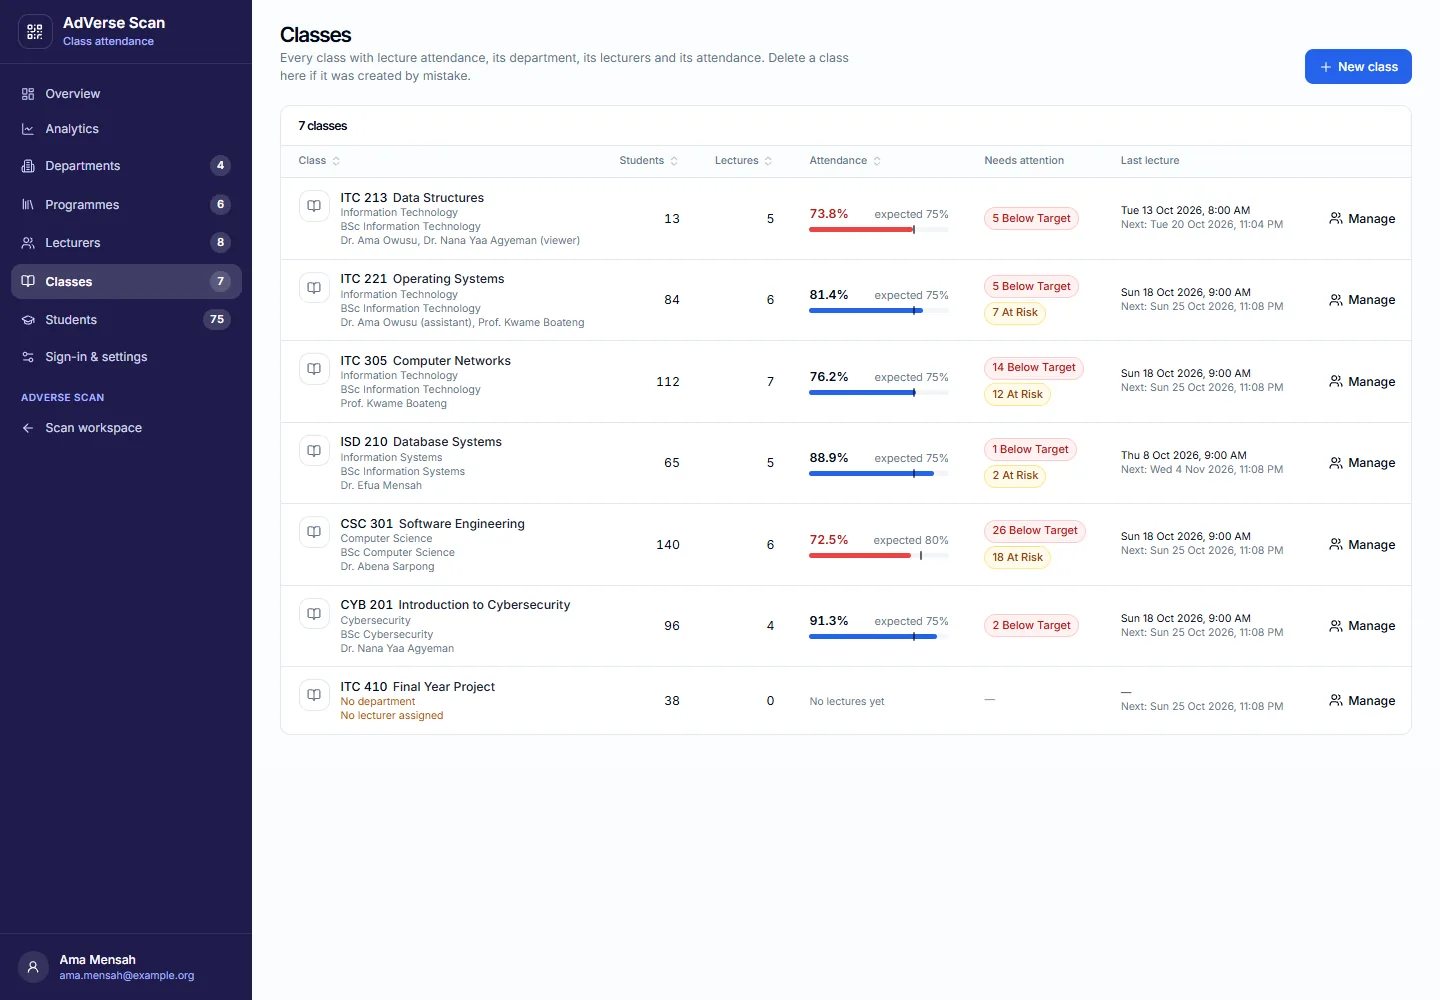
A class is one course for one offering: its students, its lectures, its expected attendance and its classroom location. The faculty or a department creates it. The lecturer runs it.
Click a column header to sort. A class with no lecturer is marked so you can assign one. Faculty and department administrators can delete a class (it leaves every dashboard; attendance already taken stays on file). Lecturers cannot delete a class.
Manage (faculty) opens who teaches the class — course lead, assistants and viewers. See Roles.
New class
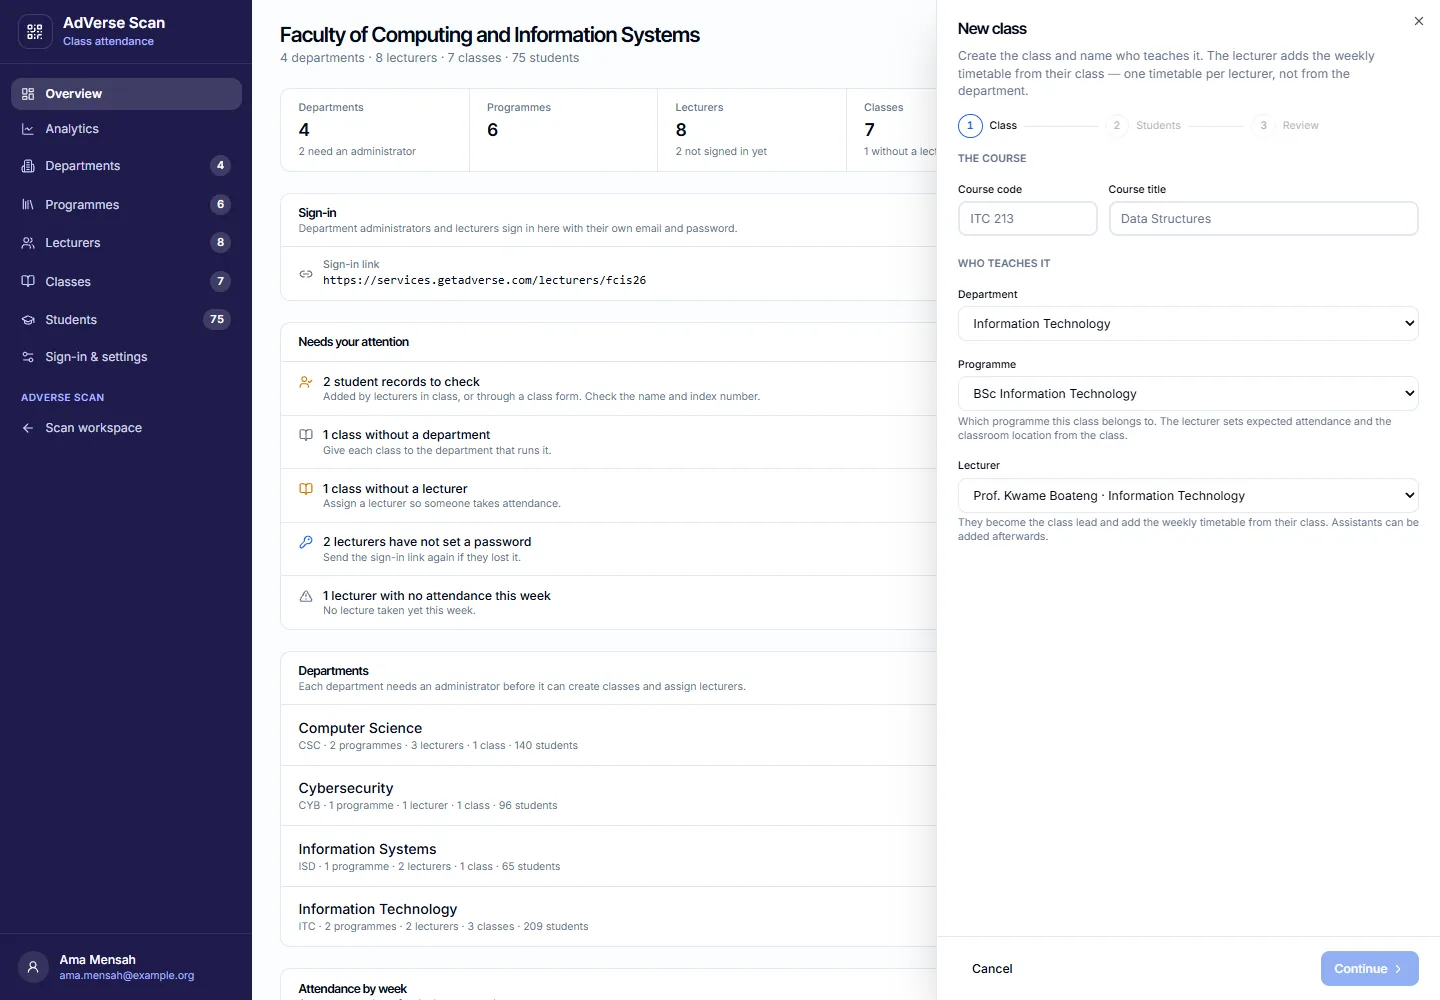
- Select New class.
- Enter the Course code and Course title (for example ITC 213, Data Structures).
- Choose the Department (faculty only — a department administrator is already in one).
- Choose the Programme. If the department has programmes, one is required. If the list is empty, add programmes first.
- Optionally assign a Lecturer. They become the course lead and add the weekly timetable from their own class. You can assign later.
- On Students, optionally enrol a programme and level from the register, or paste a class list. Or skip — add students later. Nobody is contacted.
- Review and select Create class.
The department does not set expected %, warning % or sign-out when the class is created. The course lead sets those in Setup. New classes start at 75% expected, 80% warning, and no sign-out, until the lecturer changes them.
A department cannot keep each lecturer’s hours. The lead adds the timetable from the class — including different times on different days.
7Students
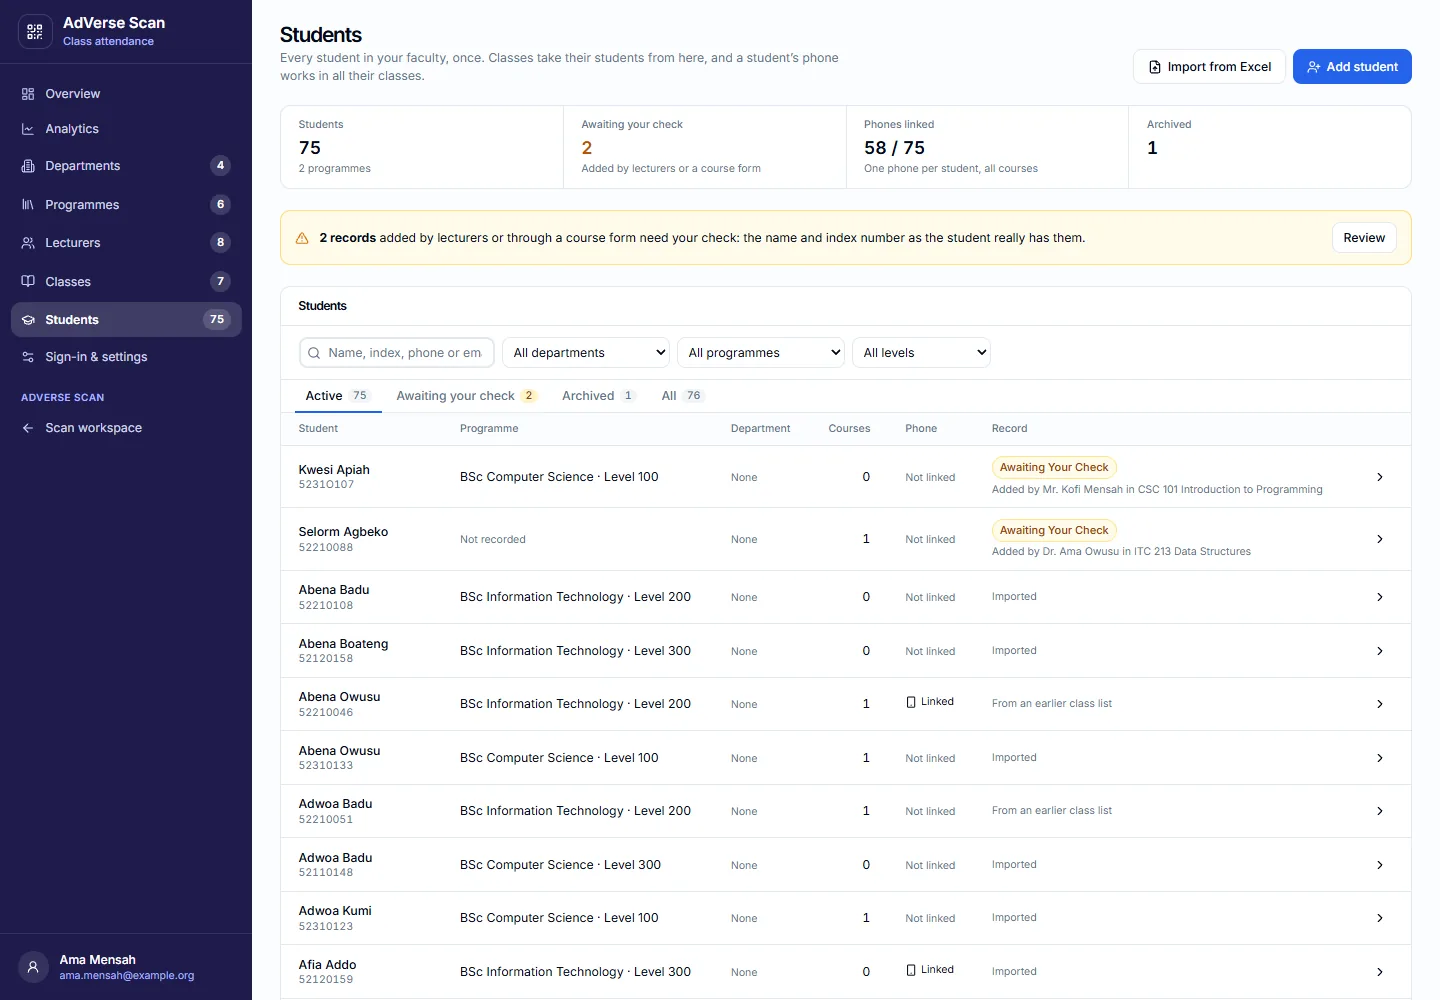
The register is the faculty’s directory: name, index number, programme, level, phone and email. A student is added once, then enrolled on any class. Views: Active, Needs review (added by a lecturer or a class form — check the record), Archived and All.
Add or import students
- Select Add student for one person, or import a spreadsheet (index number and name are enough; add programme, level, phone and email when you have them).
- Students the faculty or department add are trusted. Students a lecturer adds, or who register on the class form, appear under Needs review until you accept them.
- Enrol a student on a class from their record, or enrol a whole programme and level from New class or from the class’s Students tab.
Index numbers must be unique. If you paste a list and an index already exists under another name, the register’s name is kept.
8Sign-in & settings
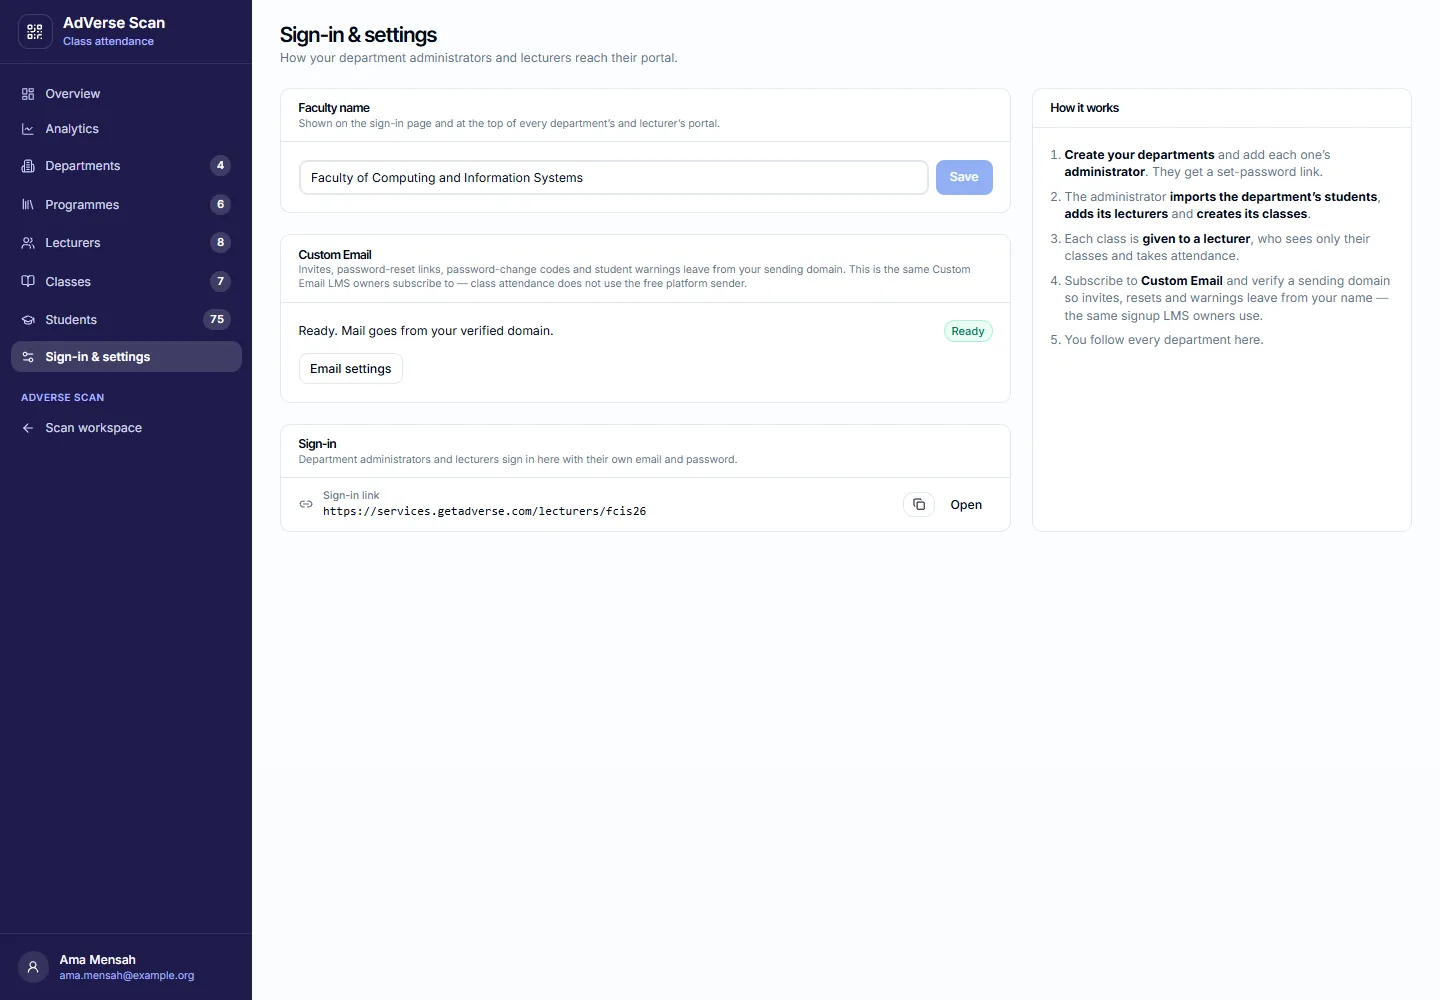
- Faculty name — shown on the lecturer sign-in page and at the top of every portal. This is your name, not a sample name.
- Custom Email — invites, password-reset links, password-change codes and student warnings leave from your verified sending domain. Class attendance does not use the free platform sender. Subscribe and verify a domain (the same Custom Email LMS owners use).
- Sign-in link — share this with every department administrator and lecturer. It does not change when you rename the faculty.
- Your own domain — connect attendance.yourschool.edu (or similar) under LAINNOV Settings → Domains, choose Class Attendance, and add the DNS records. After it is active, the sign-in link and classroom codes use that address.
9The lecturer portal
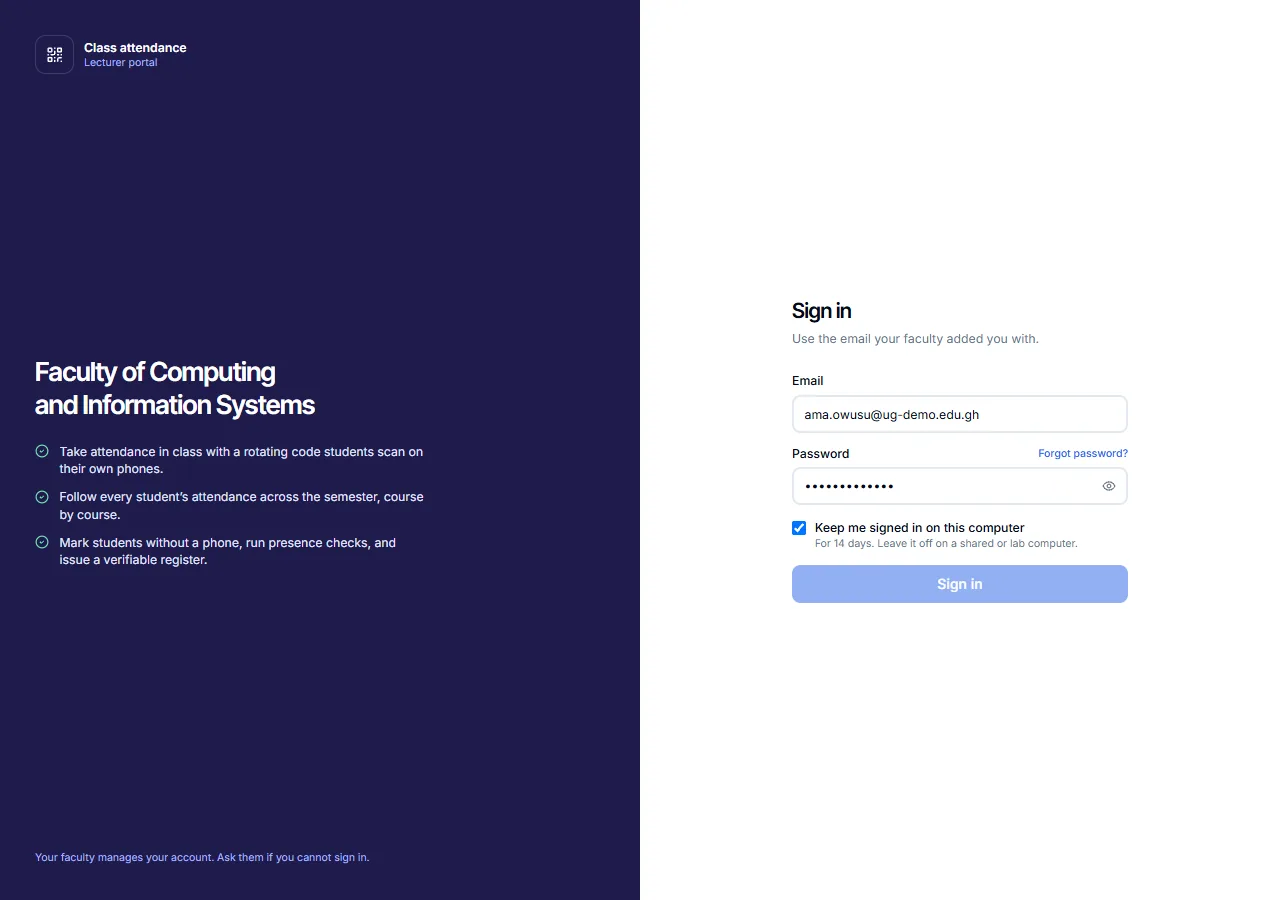
Lecturers and department administrators open the sign-in link, enter the email they were invited with, and set a password from the invitation (or later from Forgot password). Codes for a password change go to their email and, when they have a phone on file, by SMS.
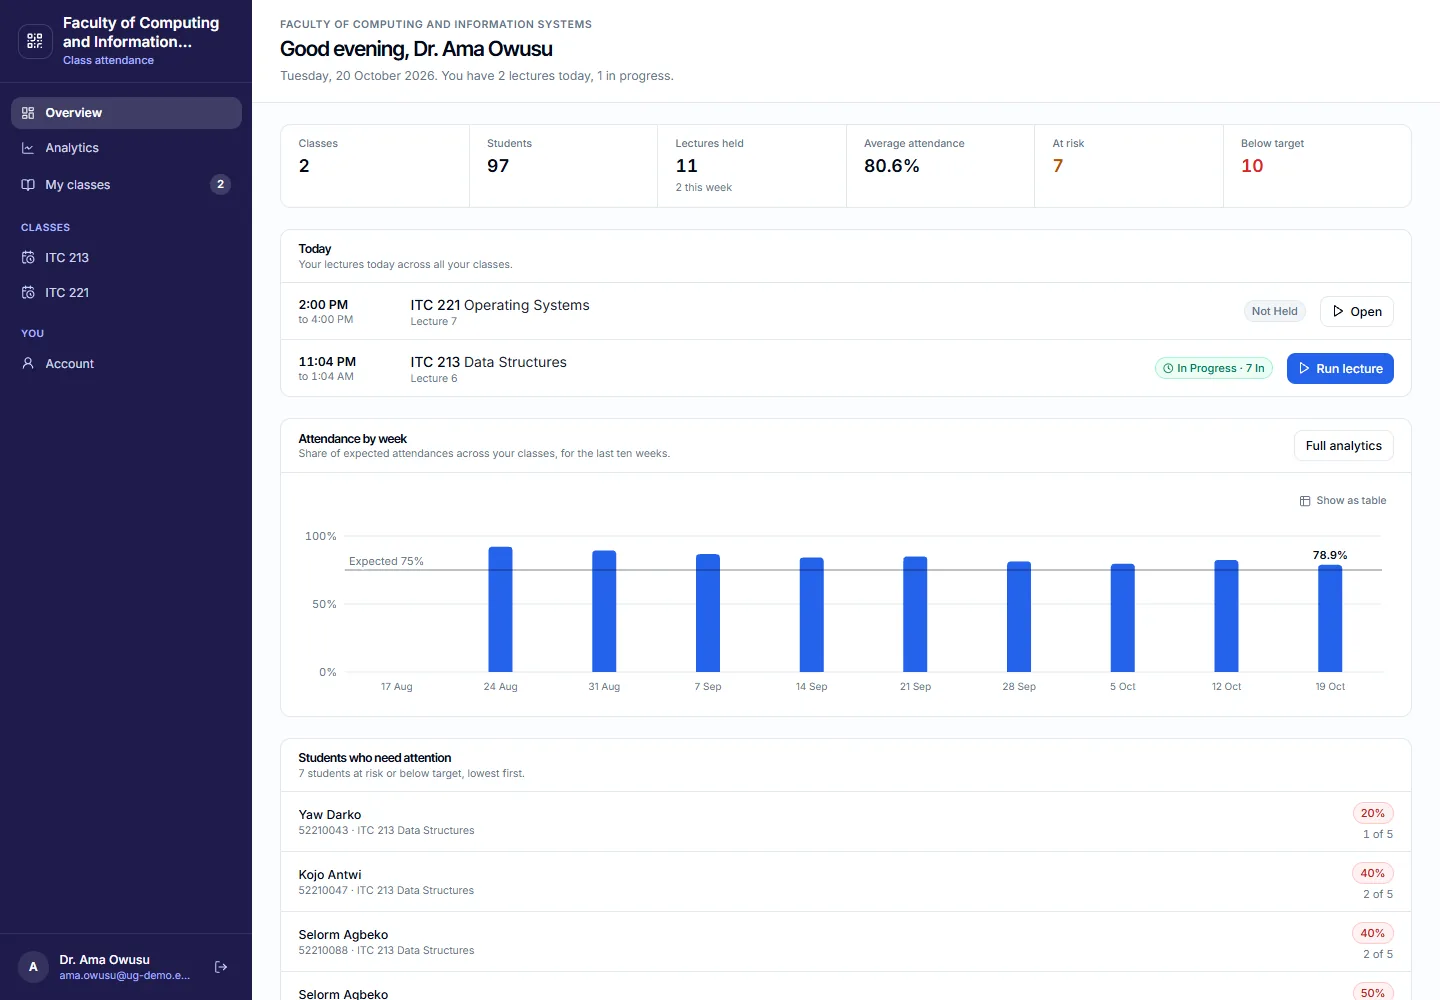
- Today — lectures scheduled for today, with Run lecture when they can take attendance.
- My classes — only the classes they are assigned to, and their role on each.
- Account — their name, phone and password. A department administrator also sees the department workspace (classes, lecturers and students for that department only).
10Inside a class
Open a class from the faculty, the department or the lecturer portal. The sections are the same; what you can change depends on your role.
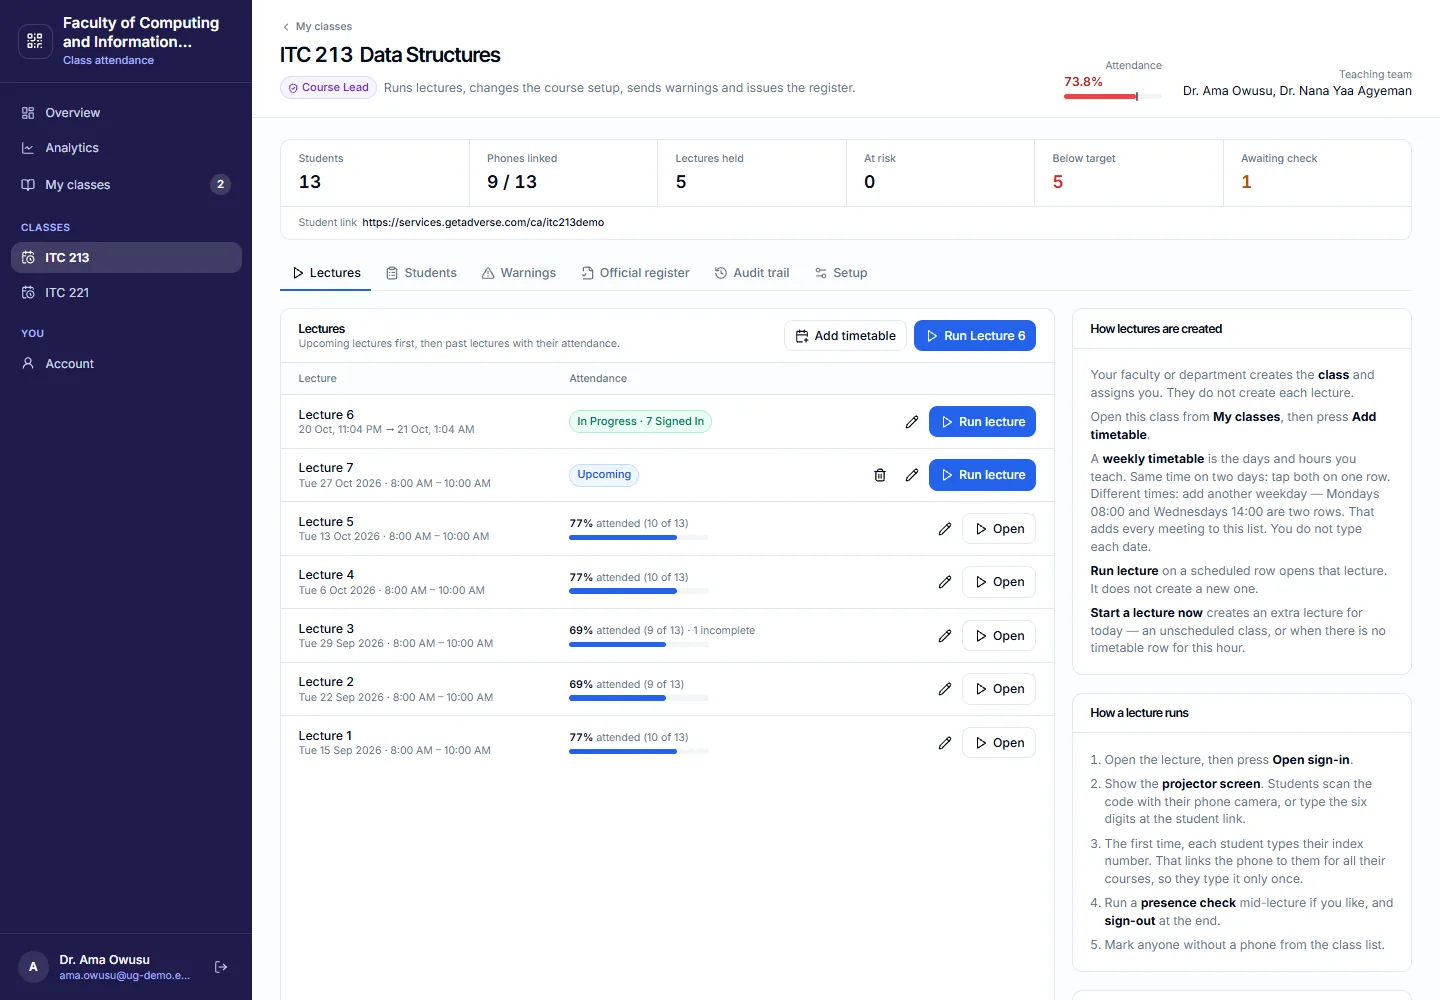
Lectures and the weekly timetable
- The course lead (or assistant) opens Lectures.
- Weekly timetable — pick the days, and the start time and duration for each day if they differ. Choose the date range (for example the semester). Existing lectures on those days are left as they are.
- Add a lecture for a one-off session, or Start a lecture now when you are already in the room and nothing was scheduled for today.
- Change or delete a lecture that has not been used. A lecture that already has sign-ins stays on file.
Opening sign-in on a lecture scheduled for another day records today’s students under that day. If you tap a future lecture by mistake, the screen offers to start today’s lecture instead.
Run a lecture
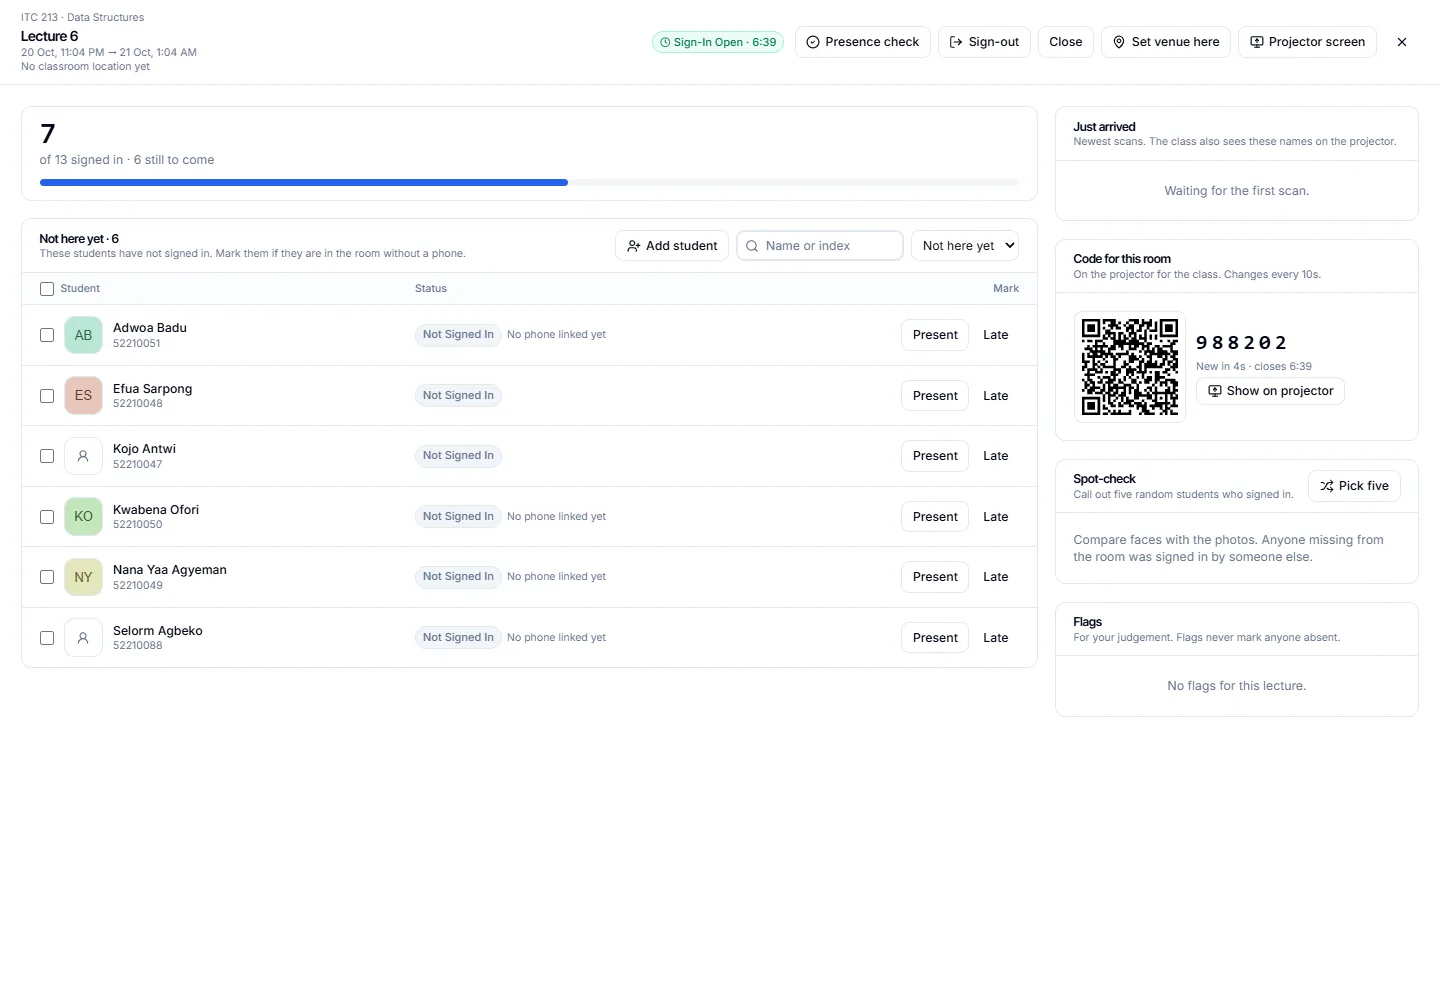
- Select Run lecture on today’s row (or Start a lecture now).
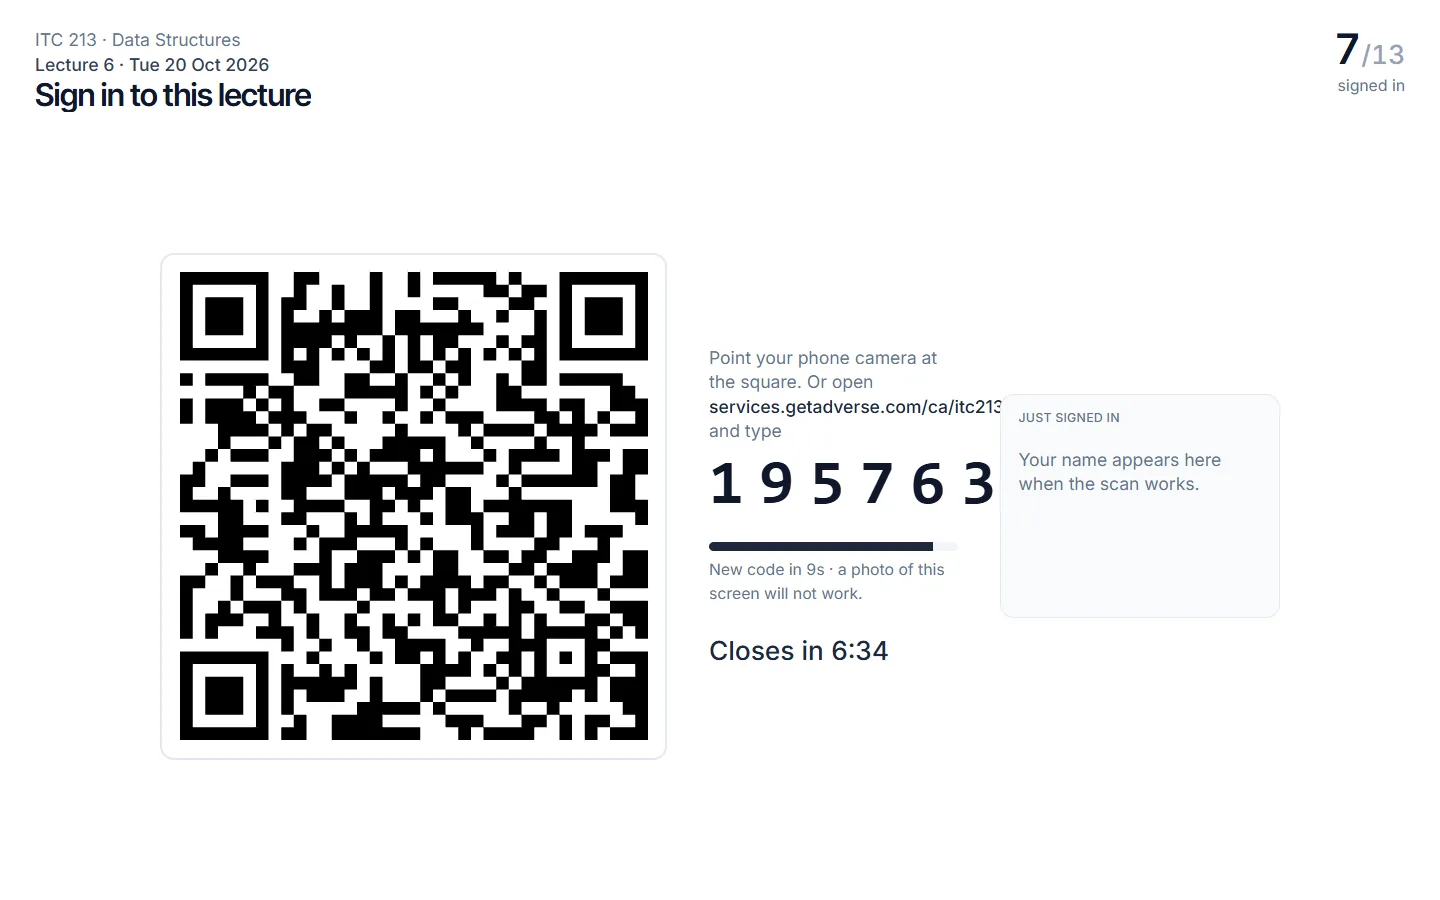
- Select Open sign-in. The projector screen opens so you can put the rotating code on the classroom display.
- Students scan with their own phones. The roster updates as they sign in. Use Not here yet to find the rest, and Mark present for anyone in the room without a phone.
- Optional: Presence check — everyone scans again so you know they are still in the room. Sign-out — if you turned sign-out on in Setup, open it before you close.
- Set venue here (or Update venue) stores this device’s location as the classroom. Students away from it are flagged, never blocked. See Classroom location.
- Projector screen puts the code on a second window. Leave that window on the display; it follows the lecture you are running.
- Close the lecture when you are done. Only one lecture of a course takes attendance at a time — opening another closes this one’s code.
Flags you may see: another phone tried this index number; a phone tried to sign in someone else; away from the venue; location not shared; signed in in the last seconds; a presence check without a sign-in. A student on a new phone can ask you to move them to it — approve only when you can see the student.
Students on the class
Everyone enrolled, their attendance rate, and whether they are on track, at risk or below target. Rate = lectures they attended ÷ (lectures held since they joined − excused).
The course lead can add students (from the register or a pasted list) and take a student off the class. Attendance already taken stays recorded. Unlink a phone from Setup or the live roster if the student has a new phone and you have not approved a move.
Attendance warnings
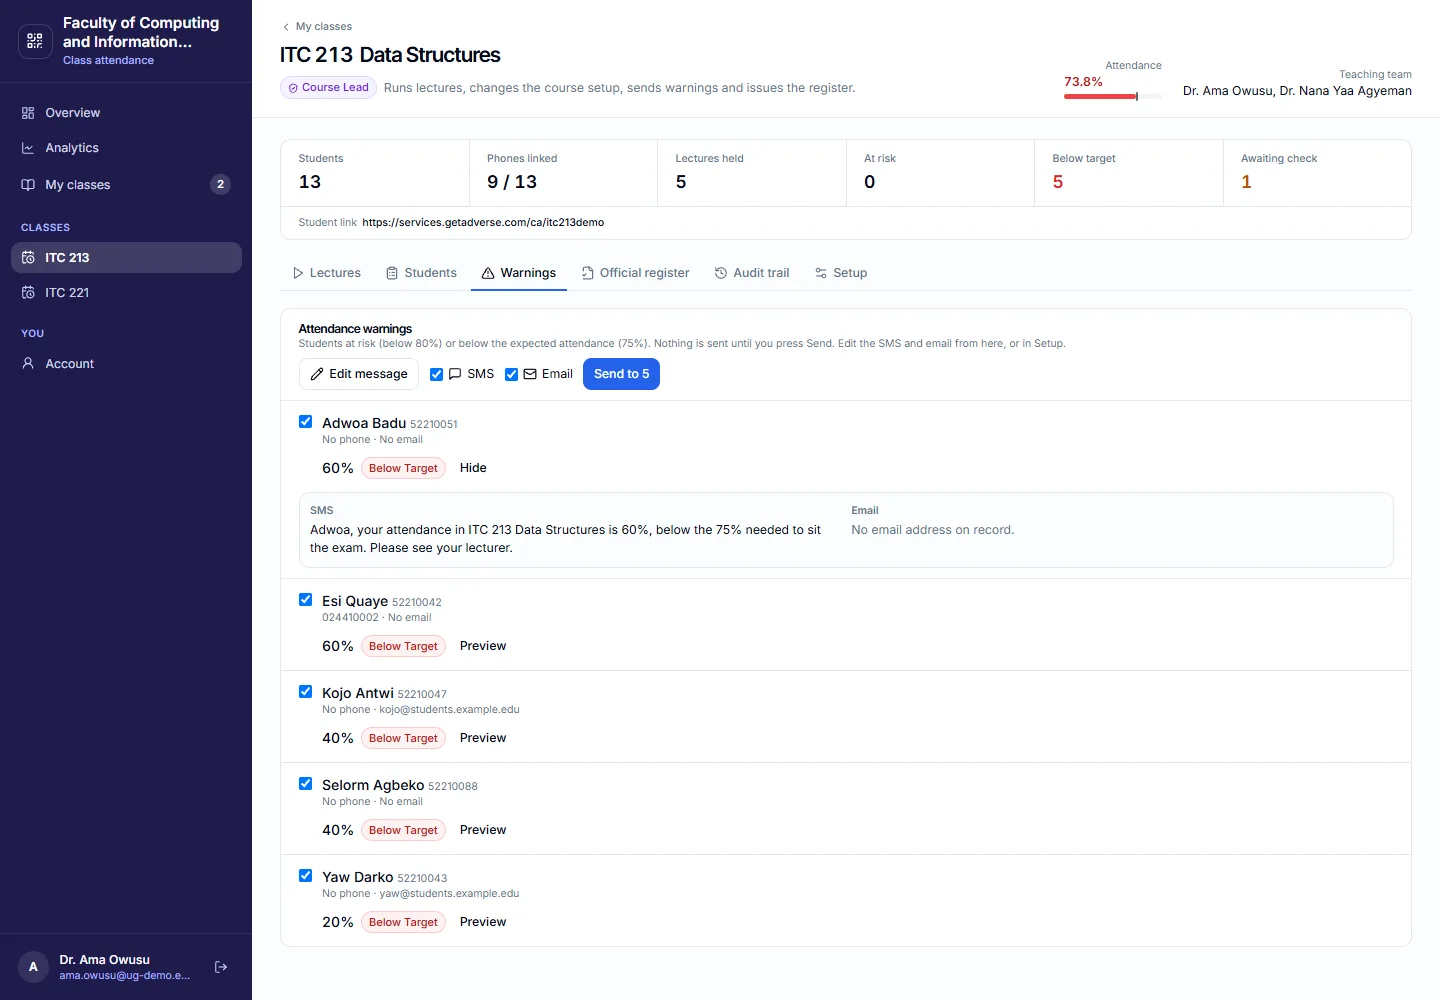
The course lead (or an assistant) opens Warnings, checks the list, edits the SMS and email if needed, then sends. Words in curly brackets — {first}, {course}, {pct}, {expected} and the rest — are filled in for each student. Leave a box empty to keep the built-in wording. Your name, department and faculty are added at the end of the email.
In Setup you can also turn on Send warnings automatically every week. Nobody is warned twice for the same dip. Email needs Custom Email; SMS needs credits and a lecturer allowed to send texts.
Official register
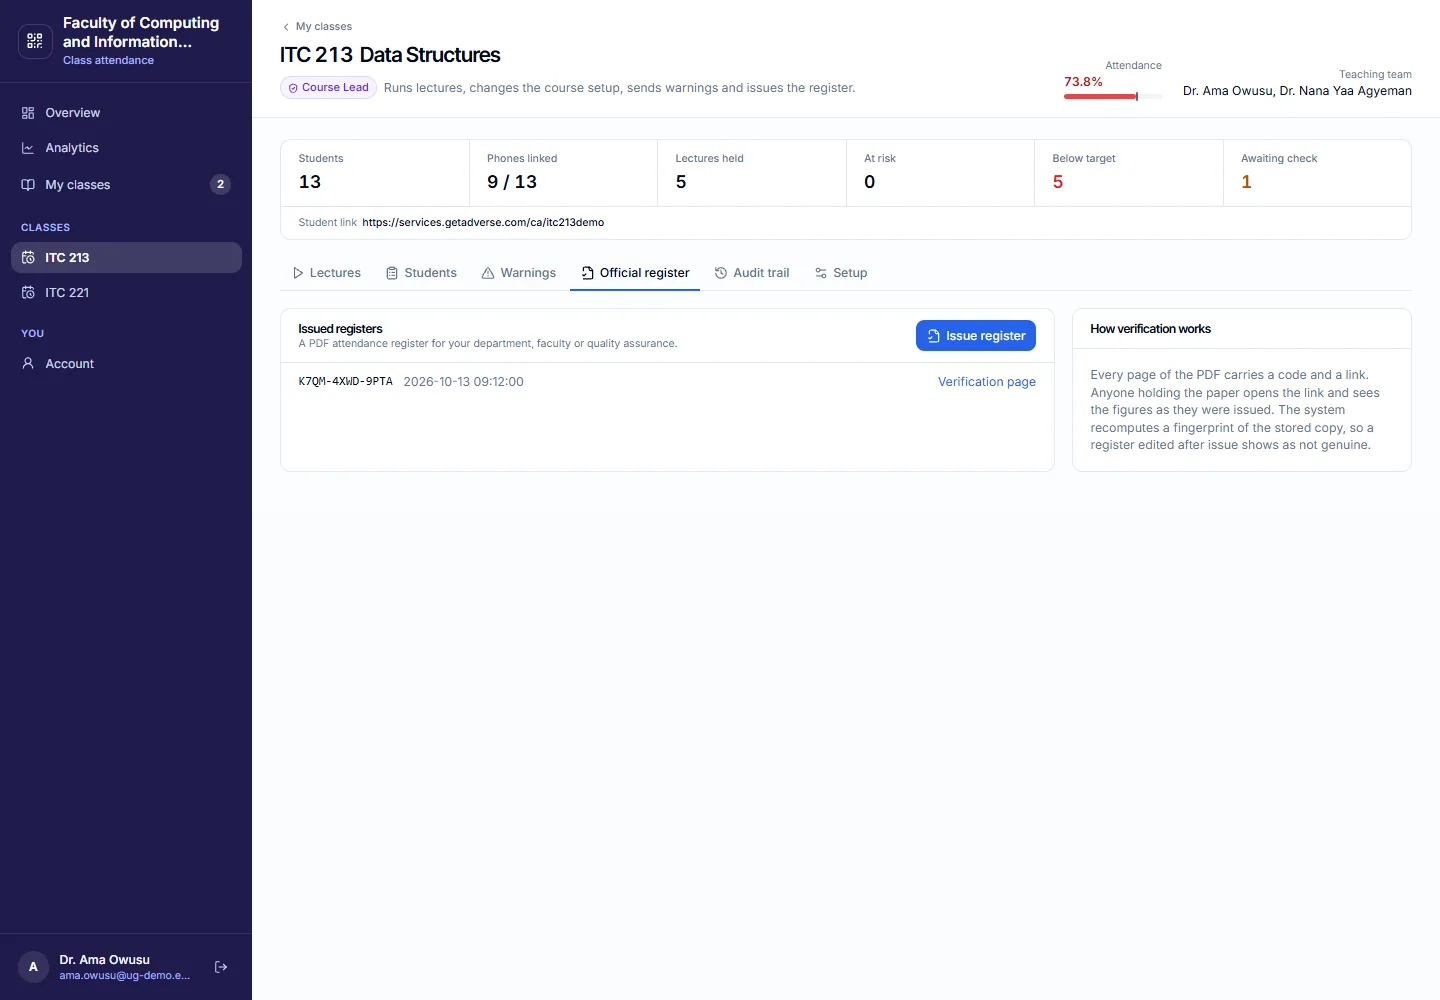
Issue register freezes the standing on that day: who has what mark for each counted lecture. Download the PDF. Anyone with the verify link can check that the copy matches what was issued.
Audit trail
Who opened a lecture, marked a student, sent warnings, changed Setup, or unlinked a phone. Faculty, department and the course lead can read it.
Setup
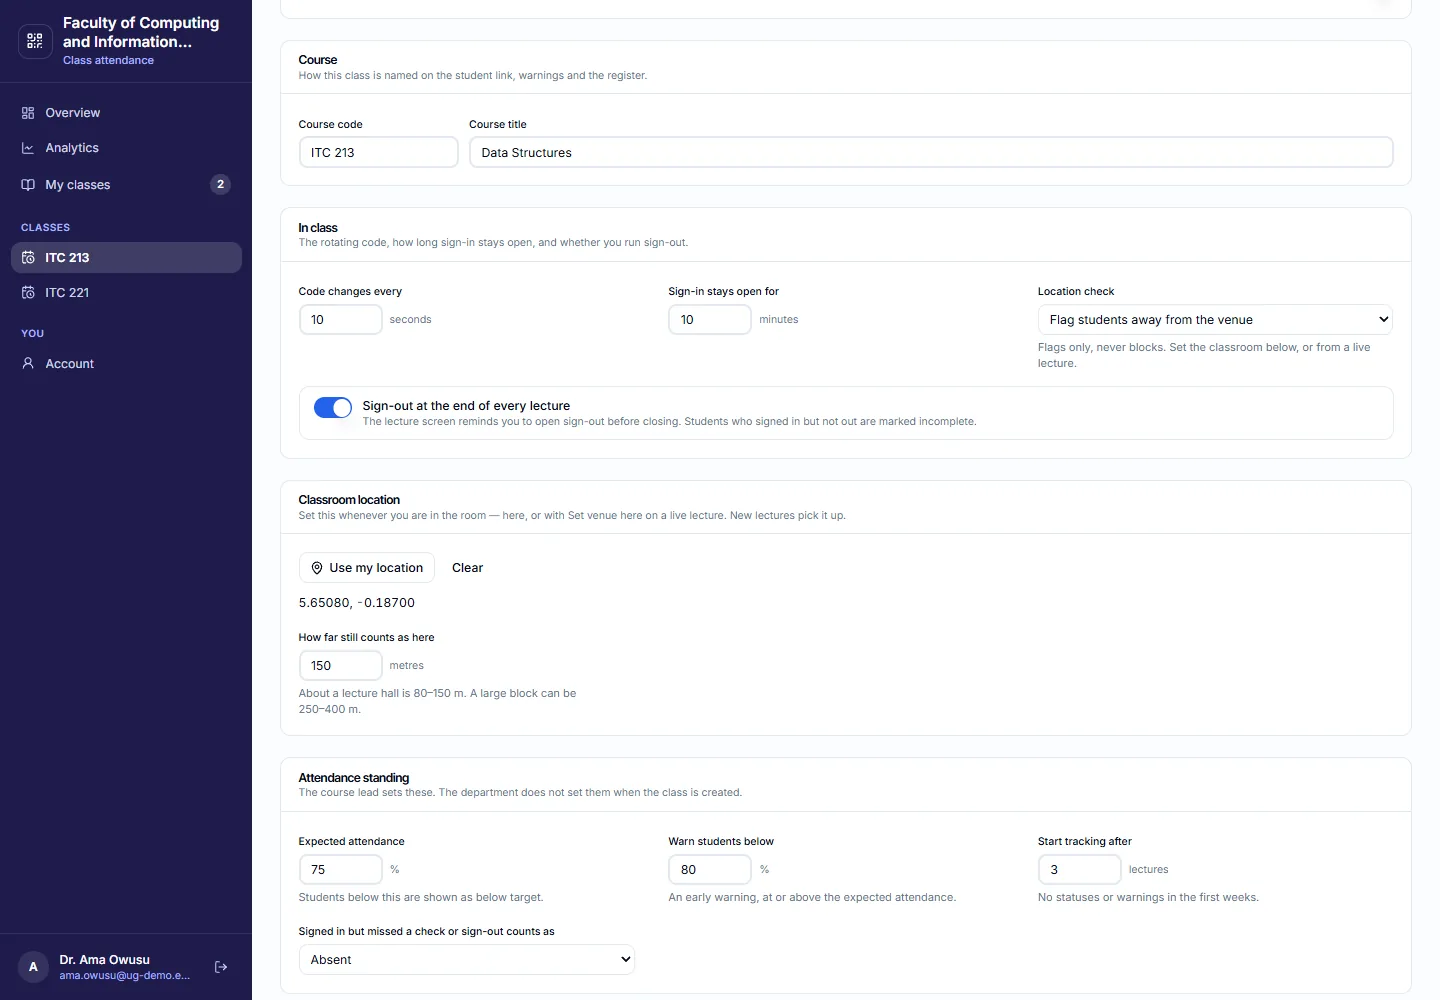
The course lead sets how this class is run. Assistants and viewers can see the settings but cannot change them.
- Lecture mode — on, so you can project a rotating code.
- Course code and Course title — how the class is named on the student link, warnings and the register.
- Code changes every (seconds) and Sign-in stays open for (minutes).
- Location check — Off, or Flag students away from the venue (flags only, never blocks).
- Sign-out at the end of every lecture — the lecture screen reminds you to open sign-out. Students who signed in but not out are marked incomplete.
- Expected attendance — students below this are below target. Warn students below must be at or above that. Start tracking after a number of lectures so the first weeks stay quiet.
- Signed in but missed a check or sign-out counts as — Absent, Attended (late), or Attended.
Classroom location
The lecturer sets the venue whenever they are in the room — not the department, and not only when the class is created.
- In Setup › Classroom location, stand in the room and select Use my location. Allow location on the device. Set How far still counts as here (about 80–150 m for a lecture hall, more for a large block). Save. Turn Location check to flag students away from the venue.
- Or, during a live lecture, select Set venue here. That updates this lecture and the class default. New lectures pick the class venue up.
Students who sign in outside the radius, or who do not share a location, are flagged on the roster. They are still signed in.
11What students see
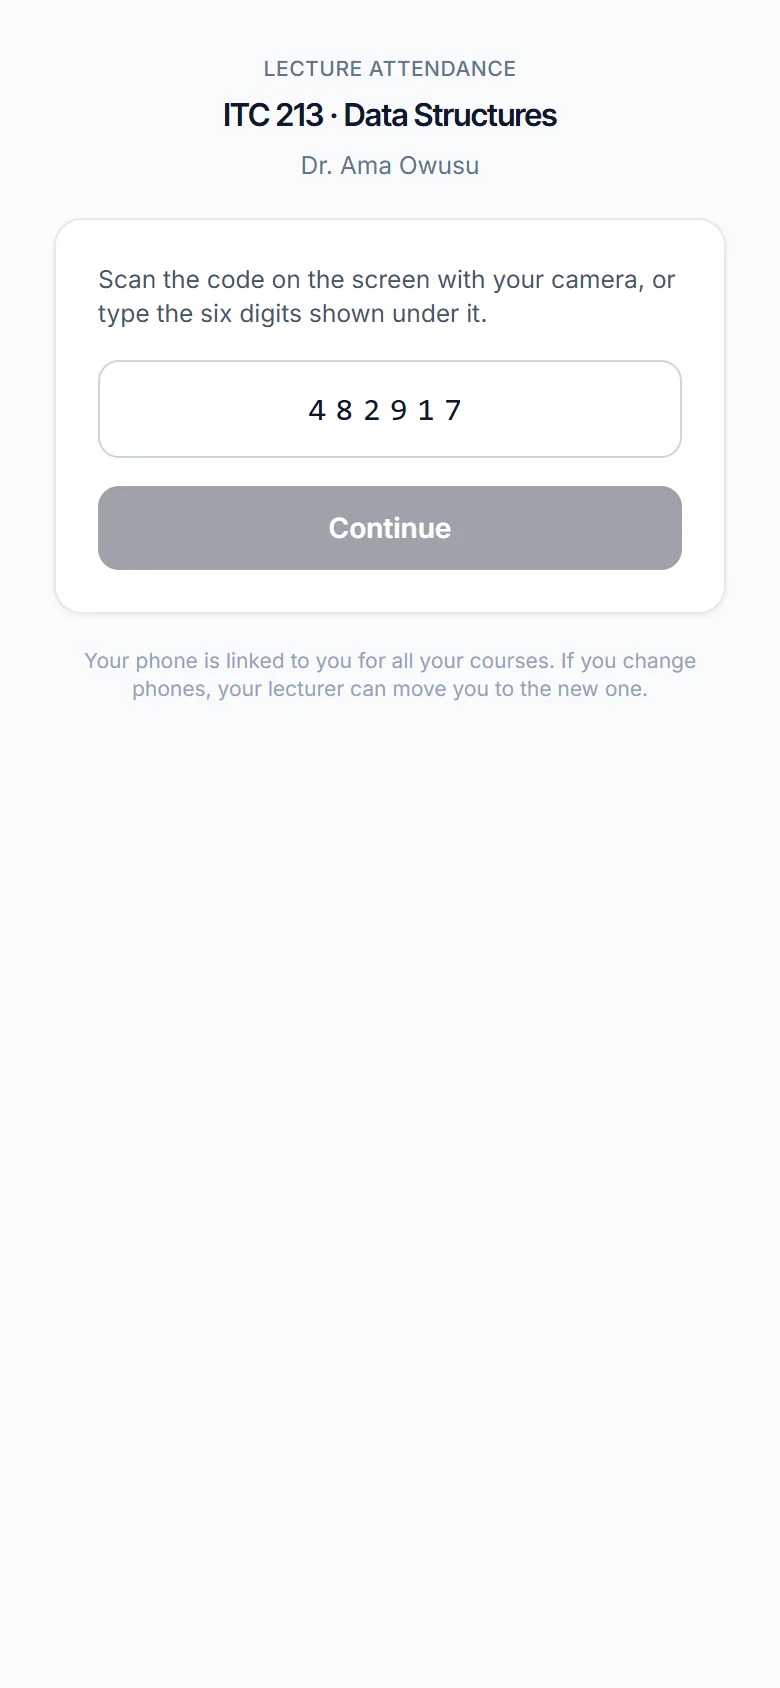
- The student opens the camera (or the class link) and scans the code on the projector.
- The first time only, they type their index number. That phone is then theirs for every class in this faculty.
- They see that they signed in (or that they were late, or that sign-in is closed). They do not see other students.
If they change phones, they scan again and ask the lecturer to move them. The lecturer approves from the live lecture screen. One phone cannot stay linked to two students.
12Roles
| Who | What they can do |
|---|---|
| Faculty (the LAINNOV account) | Everything: departments, programmes, lecturers, classes, the register, analytics, Custom Email, delete a class. |
| Department administrator | The same, inside their department only. They cannot rename the faculty or see other departments. |
| Course lead | Runs lectures, changes Setup (expected attendance, venue, sign-out, warnings), sends warnings, issues the register, adds and drops students. |
| Assistant | Runs lectures, marks students, adds students and approves new phones. Cannot change Setup or delete the class. |
| Viewer | Sees the course, its lectures and its students. Changes nothing. |
| Student | Signs in on their phone. No portal. |
A lecturer may hold a different role on each class. The faculty assigns the lead when the class is created (or later under Manage).
Privacy and terms
Schools and universities should read these before they import a register. They are written for Class Attendance specifically — who holds the data, what is collected (including location flags and the phone link), how long it is kept, and what each role agrees to.
- Class Attendance Privacy Notice — for registrars, data-protection officers, lecturers and students. Also a PDF from that page.
- Class Attendance Terms — the institution, lecturers and students. Also a PDF from that page.
The institution is the data controller. LAINNOV is the processor. We do not sell student data, and location never blocks a sign-in. A student who wants a mark corrected should ask the faculty first.
Messages and fixes
| What you see | What to do |
|---|---|
| This sign-in link is not active | Check the address with the faculty. The code in the link is set when Scan is first opened and does not change when you rename the faculty. |
| That email and password do not match | Use the email you were invited with. Use Forgot password; codes go to that email and, if you have a phone on file, by SMS. |
| Your session has ended | Sign in again. Use Keep me signed in on a trusted phone. |
| Custom Email is required / mail could not be sent | The faculty subscribes to Custom Email and verifies a sending domain. Share invite links by hand until that is ready. |
| Choose a programme of this department | Pick a programme that belongs to the department you chose, or add programmes first. |
| Set the classroom location, or turn the location check off | Use my location while you are in the room, or set Location check to Off. |
| Lecture mode needs a name and an index number | In Setup, choose those questions, or add the class-list questions. |
| This lecture is not today | Start today’s lecture instead, unless you really mean to record on the scheduled day. |
| Another phone tried this index number / Linked elsewhere | The index is already on another phone. Approve a move only when you can see the student. |
| Away from the venue / Location not shared | A flag only. The student is still signed in. Update the venue if you moved rooms. |
| Your department creates classes… | Lecturers do not create classes. Ask the department administrator or the faculty. |
If something else goes wrong, write to support@lainnov.com from the email on the faculty account and say which class and which lecture.