
Staff and lecturers
Add the people who teach on your courses, give them one sign-in link, and choose exactly what each person can open: teaching, grading, attendance, messages, quizzes or stats. Screenshots use made-up staff.
Everything here is in Staff management in your LMS. Only you, the owner, can open it.
Add a lecturer
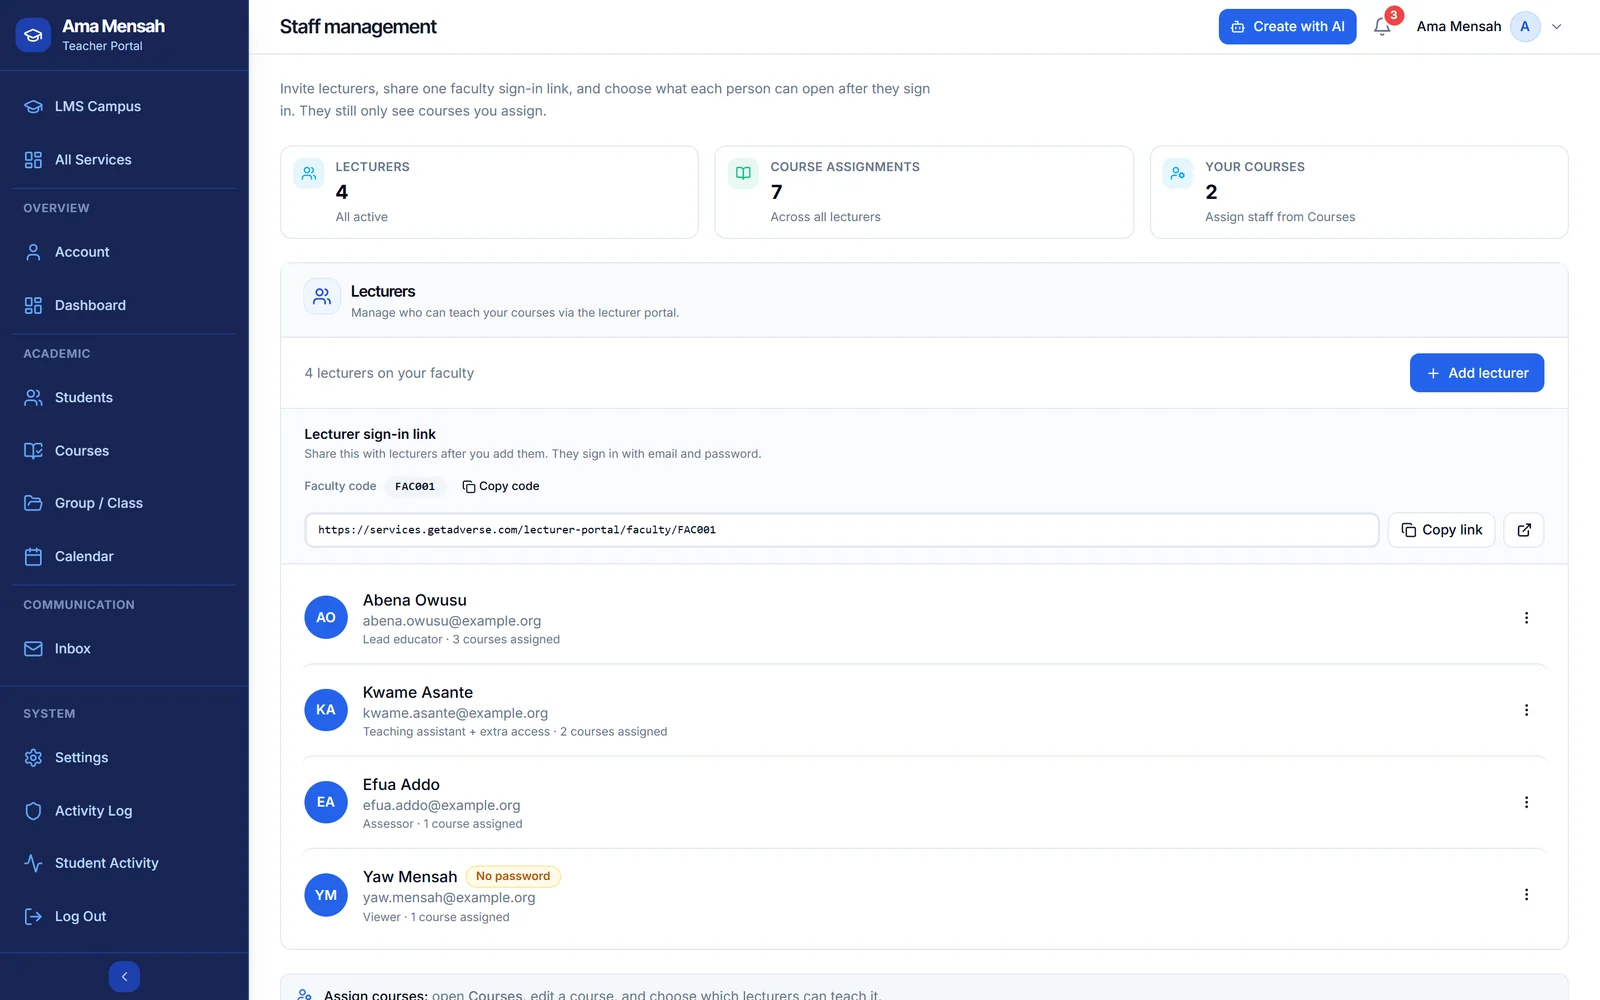
- Open Staff management and press Add lecturer.
- Enter their full name and email. The email is what they sign in with.
- Set a password for them, or leave it blank. With no password, they set their own the first time they sign in, using a code sent to that email. Until then their row says No password.
- Under LMS access, pick what they can open (see What each role can open).
- Press Add lecturer.
Share the sign-in link
Your faculty has one Lecturer sign-in link, shown at the top of the lecturer list with your faculty code. Use Copy link and send it to your staff. They sign in with their email and password and see only the courses you give them.
To see exactly what a lecturer sees, open the ⋮ menu on their row and choose Sign in as lecturer. It does not sign them out.
What each role can open
Pick a role for each lecturer. Every role works only on the courses you assign. No lecturer can open Staff management, groups or your faculty settings.
| Role | Can | Cannot |
|---|---|---|
| Lead educator | Everything on their courses: teach, change course content, grade, take attendance, enrol and remove students, Inbox, Email Hub, Quiz Hub, question bank, quiz tags and stats. | Open Staff management, groups or faculty settings. |
| Teaching assistant | Change course content, see their students, grade, take attendance, Inbox, calendar and notifications. | Enrol or remove students, Email Hub, Quiz Hub, stats (unless you tick them). |
| Assessor | See their students, mark the gradebook (including quiz answers), take attendance, calendar and notifications. | Change course content, message students, open Quiz Hub or stats. |
| Viewer | Look at their courses and the calendar. | Student lists, grades, attendance, quizzes or messages. |
| Custom access | Only the areas you tick. | Anything you leave unticked. |
Every lecturer added before roles existed is a Lead educator, so nobody lost access when roles arrived.
Add or remove single areas
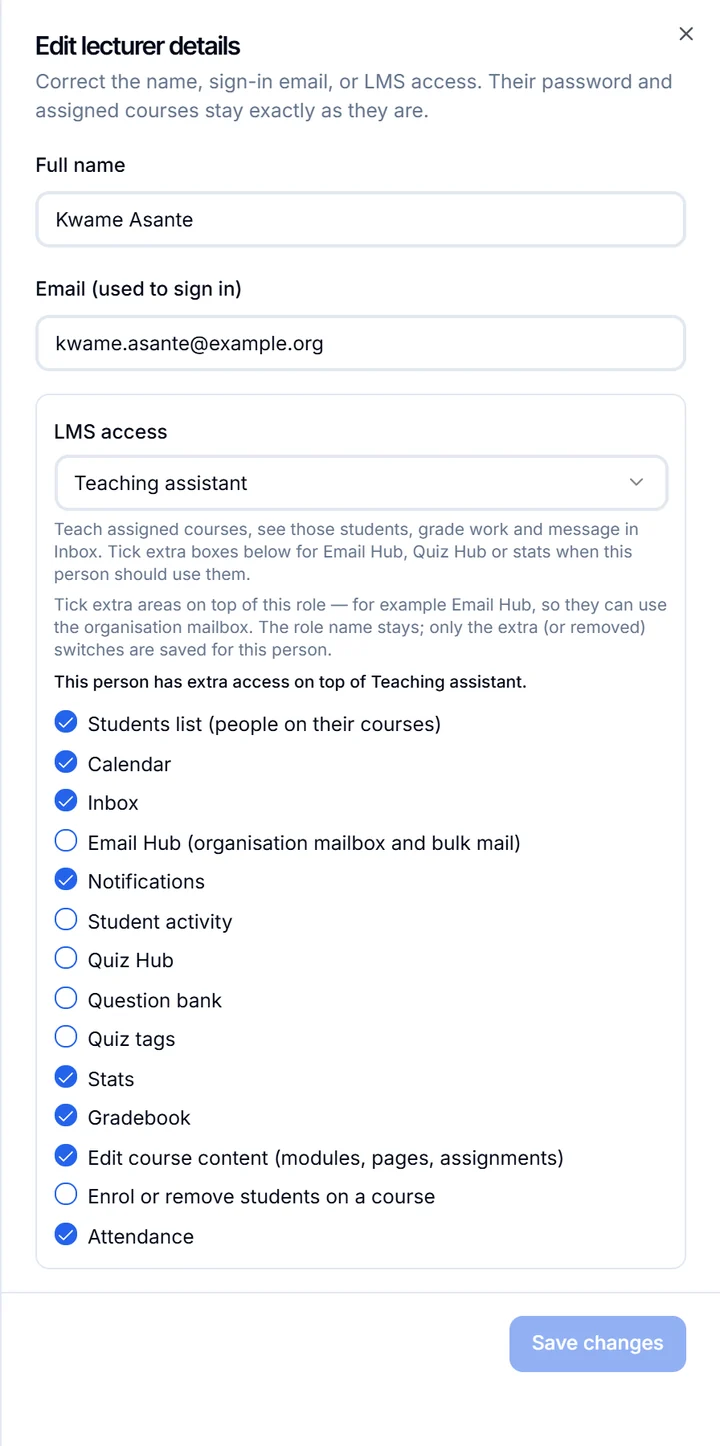
Below the role is a tick box for every area. Start from the closest role, then tick or untick single areas. For example, a teaching assistant who also needs Email Hub. Their row then reads Teaching assistant + extra access.
| Area | What it allows |
|---|---|
| Students list | See the people on their courses. |
| Calendar | See the calendar. |
| Inbox | Read and send messages. Without it, their inbox stays empty and they cannot send. |
| Email Hub | The organisation mailbox and bulk email. |
| Notifications | The notifications page. |
| Student activity | The student activity log. |
| Quiz Hub | Create, open and edit quizzes, and see their answers. |
| Question bank | The shared question bank. |
| Quiz tags | The tags used to sort questions and quizzes. |
| Stats | Course and quiz statistics. |
| Gradebook | See and enter grades, mark work and quiz answers, give feedback and publish grades. |
| Edit course content | Modules, pages, files, assignments, announcements, discussions and course events. |
| Enrol or remove students on a course | Add students to a course or take them off it. |
| Attendance | Take and change attendance. |
These limits hold everywhere, not only in the menu. Areas a lecturer does not have are hidden from them, and anything they try outside their areas is refused.
Give them courses
- Open Courses.
- On the course, open the ⋮ menu and choose Assign lecturers.
- Tick the lecturers who teach it and save.
A lecturer sees only the courses they are ticked on. What they can do on those courses is set by their role.
Change someone’s access
- On their row, open the ⋮ menu and choose Edit details.
- Pick a different role, or tick and untick single areas.
- Press Save changes.
The change applies straight away. If they are signed in, their menu updates the next time they sign in. Until then, anything they no longer have is refused.
To stop someone signing in for a while, choose Deactivate. Their courses stay as they are, and Activate lets them back in. Remove lecturer takes them off your faculty.